SpingMVC框架

1、MVC介绍

1.1 什么是MVC

  • MVC是模型(Model)、视图(View)、控制器(Controller)的简写,是一种软件设计规范。
  • 是将业务逻辑、数据、显示分离的方法来组织代码。
  • MVC主要作用是降低了视图与业务逻辑间的双向偶合
  • MVC不是一种设计模式,MVC是一种架构模式。当然不同的MVC存在差异。

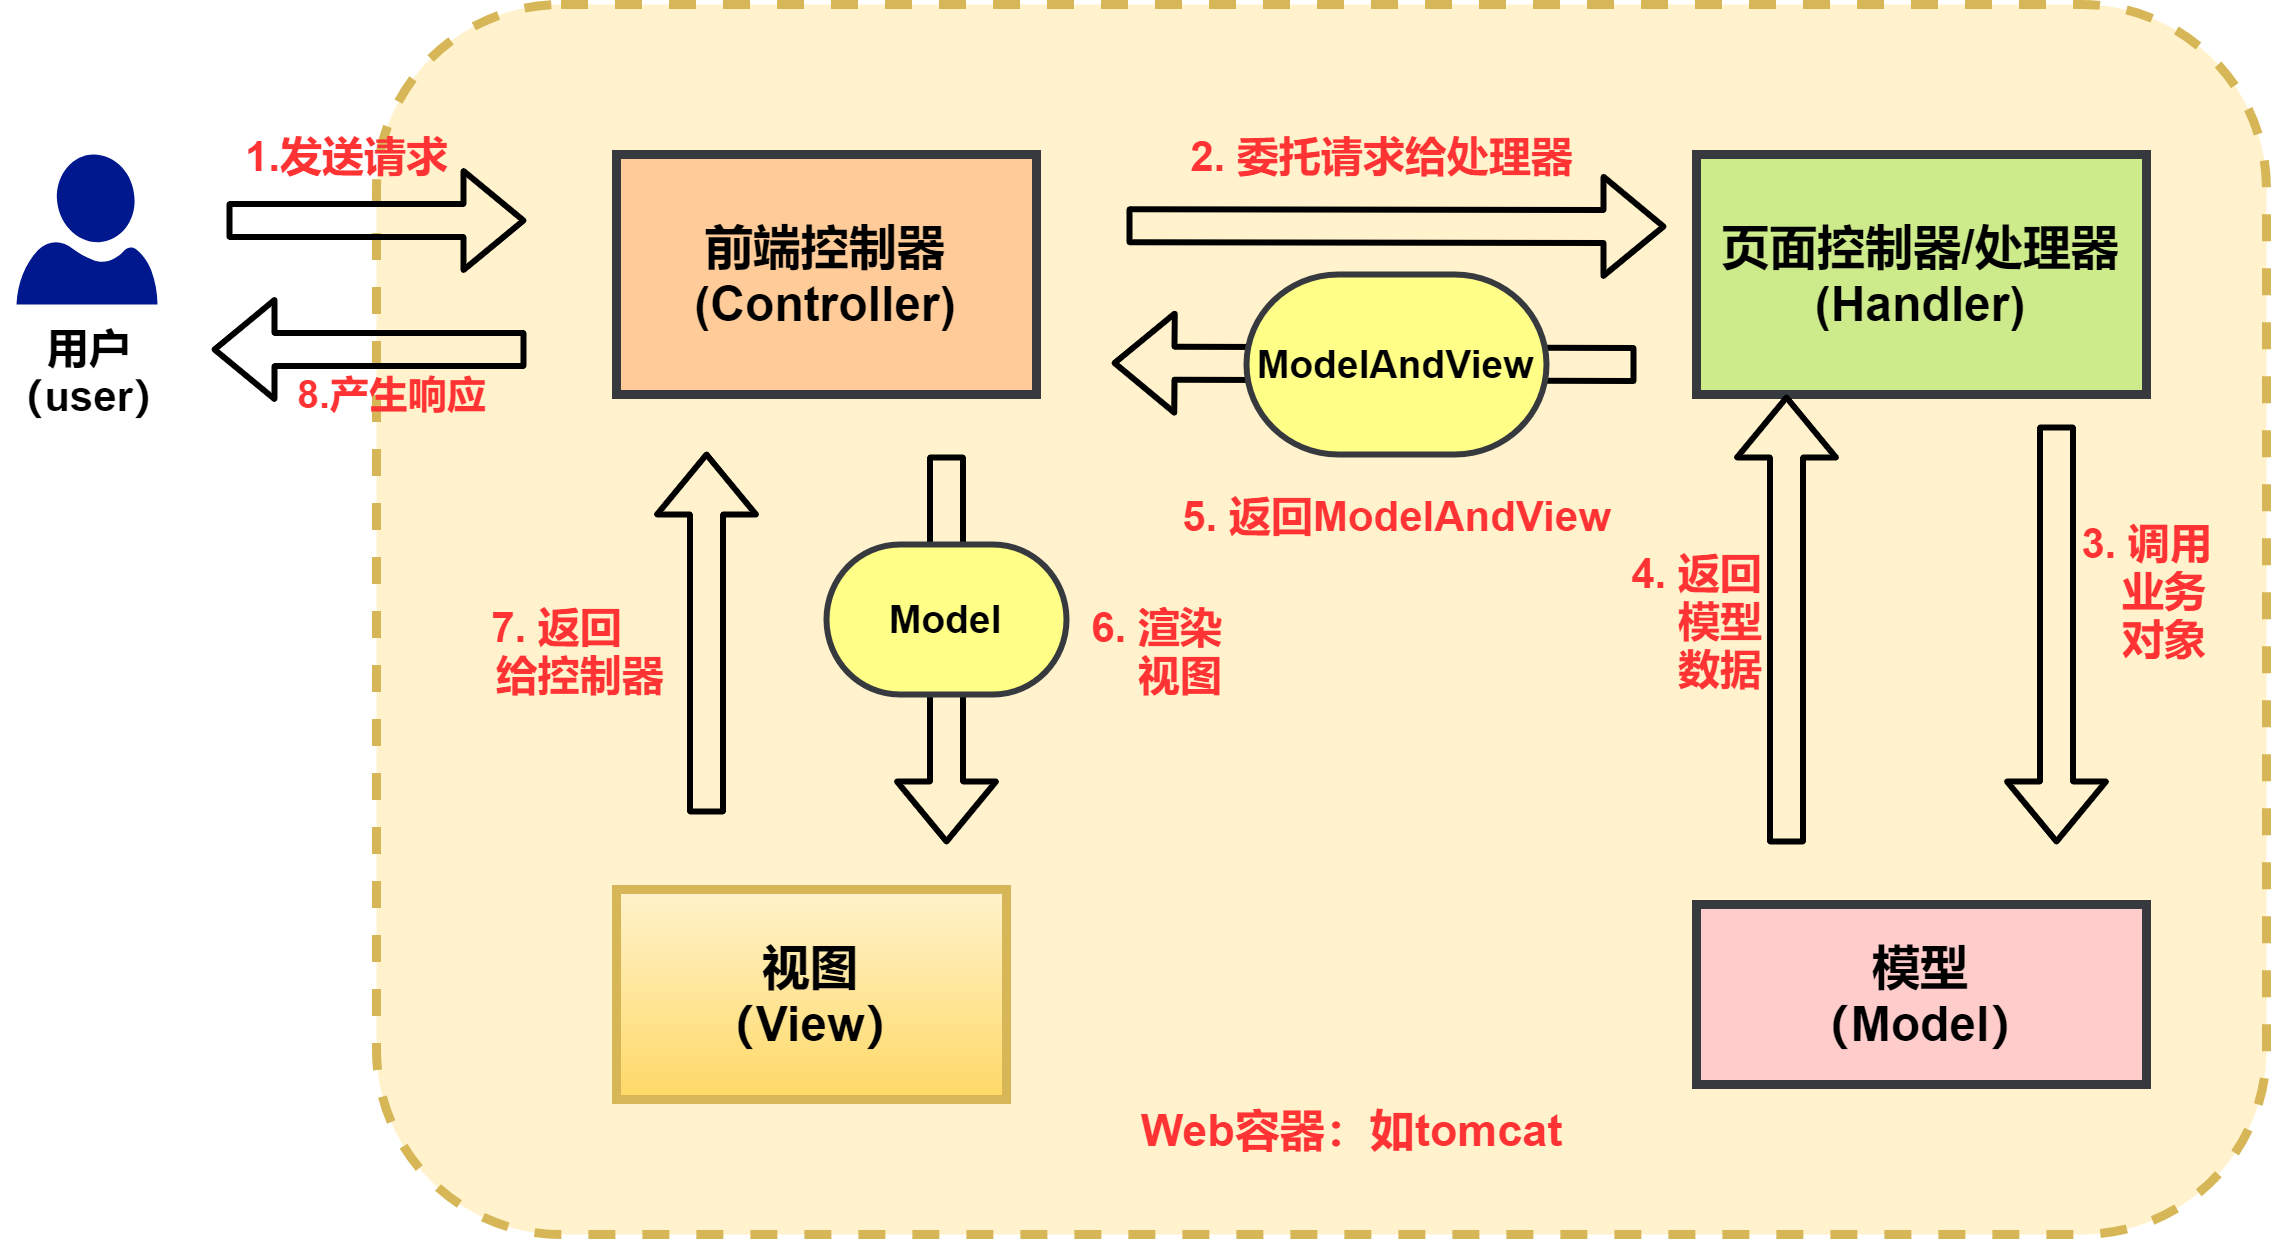
Model(模型):数据模型,提供要展示的数据,因此包含数据和行为,可以认为是领域模型或JavaBean组件(包含数据和行为),不过现在一般都分离开来:Value Object(数据Dao) 和 服务层(行为Service)。也就是模型提供了模型数据查询和模型数据的状态更新等功能,包括数据和业务。

View(视图):负责进行模型的展示,一般就是我们见到的用户界面,客户想看到的东西。

Controller(控制器):接收用户请求,委托给模型进行处理(状态改变),处理完毕后把返回的模型数据返回给视图,由视图负责展示。也就是说控制器做了个调度员的工作。

最典型的MVC就是JSP + servlet + javabean的模式。

1.2 MVC 流程

一个项目分成三部分,包括视图、控制、模型。

  1. 用户发请求
  2. Servlet接收请求数据,并调用对应的业务逻辑方法
  3. 业务处理完毕,返回更新后的数据给servlet
  4. servlet转向到JSP,由JSP来渲染页面
  5. 响应给前端更新后的页面

职责分析:

Controller:控制器

  1. 取得表单数据
  2. 调用业务逻辑
  3. 转向指定的页面

Model:模型

  1. 业务逻辑
  2. 保存数据的状态

View:视图

  1. 显示页面

1.3 回顾Servlet

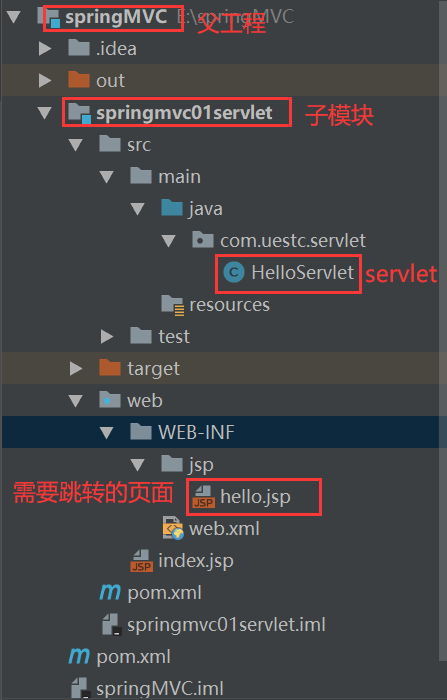
项目目录:

  1. 新建一个Maven工程当做父工程!pom依赖!

    1
    2
    3
    4
    5
    6
    7
    8
    9
    10
    11
    12
    13
    14
    15
    16
    17
    18
    19
    20
    21
    22
    23
    24
    25
    26
    27
    28
    29
    30
    31
    32
    33
    34
    35
    36
    <?xml version="1.0" encoding="UTF-8"?>
    <project xmlns="http://maven.apache.org/POM/4.0.0"
    xmlns:xsi="http://www.w3.org/2001/XMLSchema-instance"
    xsi:schemaLocation="http://maven.apache.org/POM/4.0.0 http://maven.apache.org/xsd/maven-4.0.0.xsd">
    <modelVersion>4.0.0</modelVersion>
    <groupId>com.uestc</groupId>
    <artifactId>springMVC</artifactId>
    <packaging>pom</packaging>
    <version>1.0-SNAPSHOT</version>
    <modules>
    <module>springmvc01servlet</module>
    </modules>
    <dependencies>
    <dependency>
    <groupId>org.springframework</groupId>
    <artifactId>spring-webmvc</artifactId>
    <version>5.2.7.RELEASE</version>
    </dependency>
    <dependency>
    <groupId>junit</groupId>
    <artifactId>junit</artifactId>
    <version>4.13</version>
    </dependency>

    <dependency>
    <groupId>javax.servlet</groupId>
    <artifactId>servlet-api</artifactId>
    <version>2.5</version>
    </dependency>
    <dependency>
    <groupId>javax.servlet</groupId>
    <artifactId>jstl</artifactId>
    <version>1.2</version>
    </dependency>
    </dependencies>
    </project>
  2. 建立一个Moudle:springmvc-01-servlet , 添加Web app的支持!

  3. 导入servlet 和 jsp 的 jar 依赖

  4. 编写一个Servlet类,用来处理用户的请求

    1
    2
    3
    4
    5
    6
    7
    8
    9
    10
    11
    12
    13
    14
    15
    16
    17
    18
    19
    20
    21
    22
    23
    24
    25
    26
    27
    28
    29
    30
    31
    package com.uestc.servlet;

    import javax.servlet.ServletException;
    import javax.servlet.http.HttpServlet;
    import javax.servlet.http.HttpServletRequest;
    import javax.servlet.http.HttpServletResponse;
    import java.io.IOException;


    public class HelloServlet extends HttpServlet {
    @Override
    protected void doGet(HttpServletRequest req, HttpServletResponse resp) throws ServletException, IOException {
    //1.获取参数
    String method=req.getParameter("method");
    if(method.equals("add")){
    req.getSession().setAttribute("msg","执行了add方法");
    }
    if(method.equals("delete")){
    req.getSession().setAttribute("msg","执行了delete方法");
    }
    //2.业务逻辑
    //3.视图跳转
    req.getRequestDispatcher("/WEB-INF/jsp/hello.jsp").forward(req,resp);

    }

    @Override
    protected void doPost(HttpServletRequest req, HttpServletResponse resp) throws ServletException, IOException {
    this.doGet(req,resp);
    }
    }
  5. 编写Hello.jsp,在WEB-INF目录下新建一个jsp的文件夹,新建hello.jsp

    1
    2
    3
    4
    5
    6
    7
    8
    9
    10
    11
    12
    13
    14
    15
    16
    <%--
    Created by IntelliJ IDEA.
    User: Liu Fei
    Date: 2020/12/28
    Time: 13:46
    To change this template use File | Settings | File Templates.
    --%>
    <%@ page contentType="text/html;charset=UTF-8" language="java" %>
    <html>
    <head>
    <title>liufei</title>
    </head>
    <body>
    ${msg}
    </body>
    </html>
  6. web.xml中注册Servlet

    1
    2
    3
    4
    5
    6
    7
    8
    9
    10
    11
    12
    13
    14
    15
    16
    <?xml version="1.0" encoding="UTF-8"?>
    <web-app xmlns="http://xmlns.jcp.org/xml/ns/javaee"
    xmlns:xsi="http://www.w3.org/2001/XMLSchema-instance"
    xsi:schemaLocation="http://xmlns.jcp.org/xml/ns/javaee http://xmlns.jcp.org/xml/ns/javaee/web-app_3_1.xsd"
    version="3.1">

    <servlet>
    <servlet-name>helloServlet</servlet-name>
    <servlet-class>com.uestc.servlet.HelloServlet</servlet-class>
    </servlet>

    <servlet-mapping>
    <servlet-name>helloServlet</servlet-name>
    <url-pattern>/hello</url-pattern>
    </servlet-mapping>
    </web-app>
  7. 配置Tomcat,并启动测试

    http://localhost:8080/hello?method=add

    http://localhost:8080/hello?method=delete

MVC框架要做哪些事情

  1. 将url映射到java类或java类的方法 .
  2. 封装用户提交的数据 .
  3. 处理请求–调用相关的业务处理–封装响应数据 .
  4. 将响应的数据进行渲染 . jsp / html 等表示层数据 .

说明:

​ 常见的服务器端MVC框架有:Struts、Spring MVC、ASP.NET MVC、Zend Framework、JSF;常见前端MVC框架:vue、angularjs、react、backbone;由MVC演化出了另外一些模式如:MVP、MVVM 等等….

2、SpringMVC

2.1 概述

Spring MVC是Spring Framework的一部分,是基于Java实现MVC的轻量级Web框架。

我们为什么要学习SpringMVC呢?

Spring MVC的特点:

  1. 轻量级,简单易学
  2. 高效 , 基于请求响应的MVC框架
  3. 与Spring兼容性好,无缝结合
  4. 约定优于配置
  5. 功能强大:RESTful、数据验证、格式化、本地化、主题等
  6. 简洁灵活

Spring的web框架围绕DispatcherServlet [调度Servlet ] 设计。

DispatcherServlet的作用是将请求分发到不同的处理器。从Spring 2.5开始,使用Java 5或者以上版本的用户可以采用基于注解形式进行开发,十分简洁;

正因为SpringMVC好 , 简单 , 便捷 , 易学 , 天生和Spring无缝集成(使用SpringIoC和Aop) , 使用约定优于配置 . 能够进行简单的junit测试 . 支持Restful风格 .异常处理 , 本地化 , 国际化 , 数据验证 , 类型转换 , 拦截器 等等……所以我们要学习 .

最重要的一点还是用的人多 , 使用的公司多 .

2.2 中央控制器

Spring的web框架围绕DispatcherServlet设计。DispatcherServlet的作用是将请求分发到不同的处理器。从Spring 2.5开始,使用Java 5或者以上版本的用户可以采用基于注解的controller声明方式。

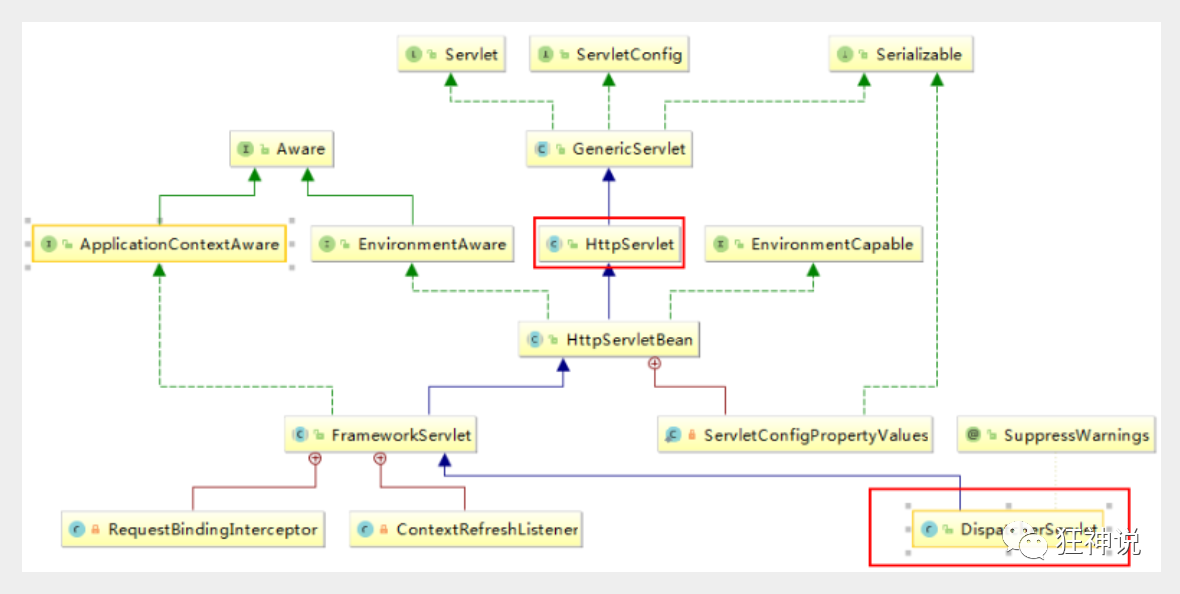
Spring MVC框架像许多其他MVC框架一样, 以请求为驱动 , 围绕一个中心Servlet分派请求及提供其他功能DispatcherServlet是一个实际的Servlet (它继承自HttpServlet 基类)

SpringMVC的组件

如下图所示:

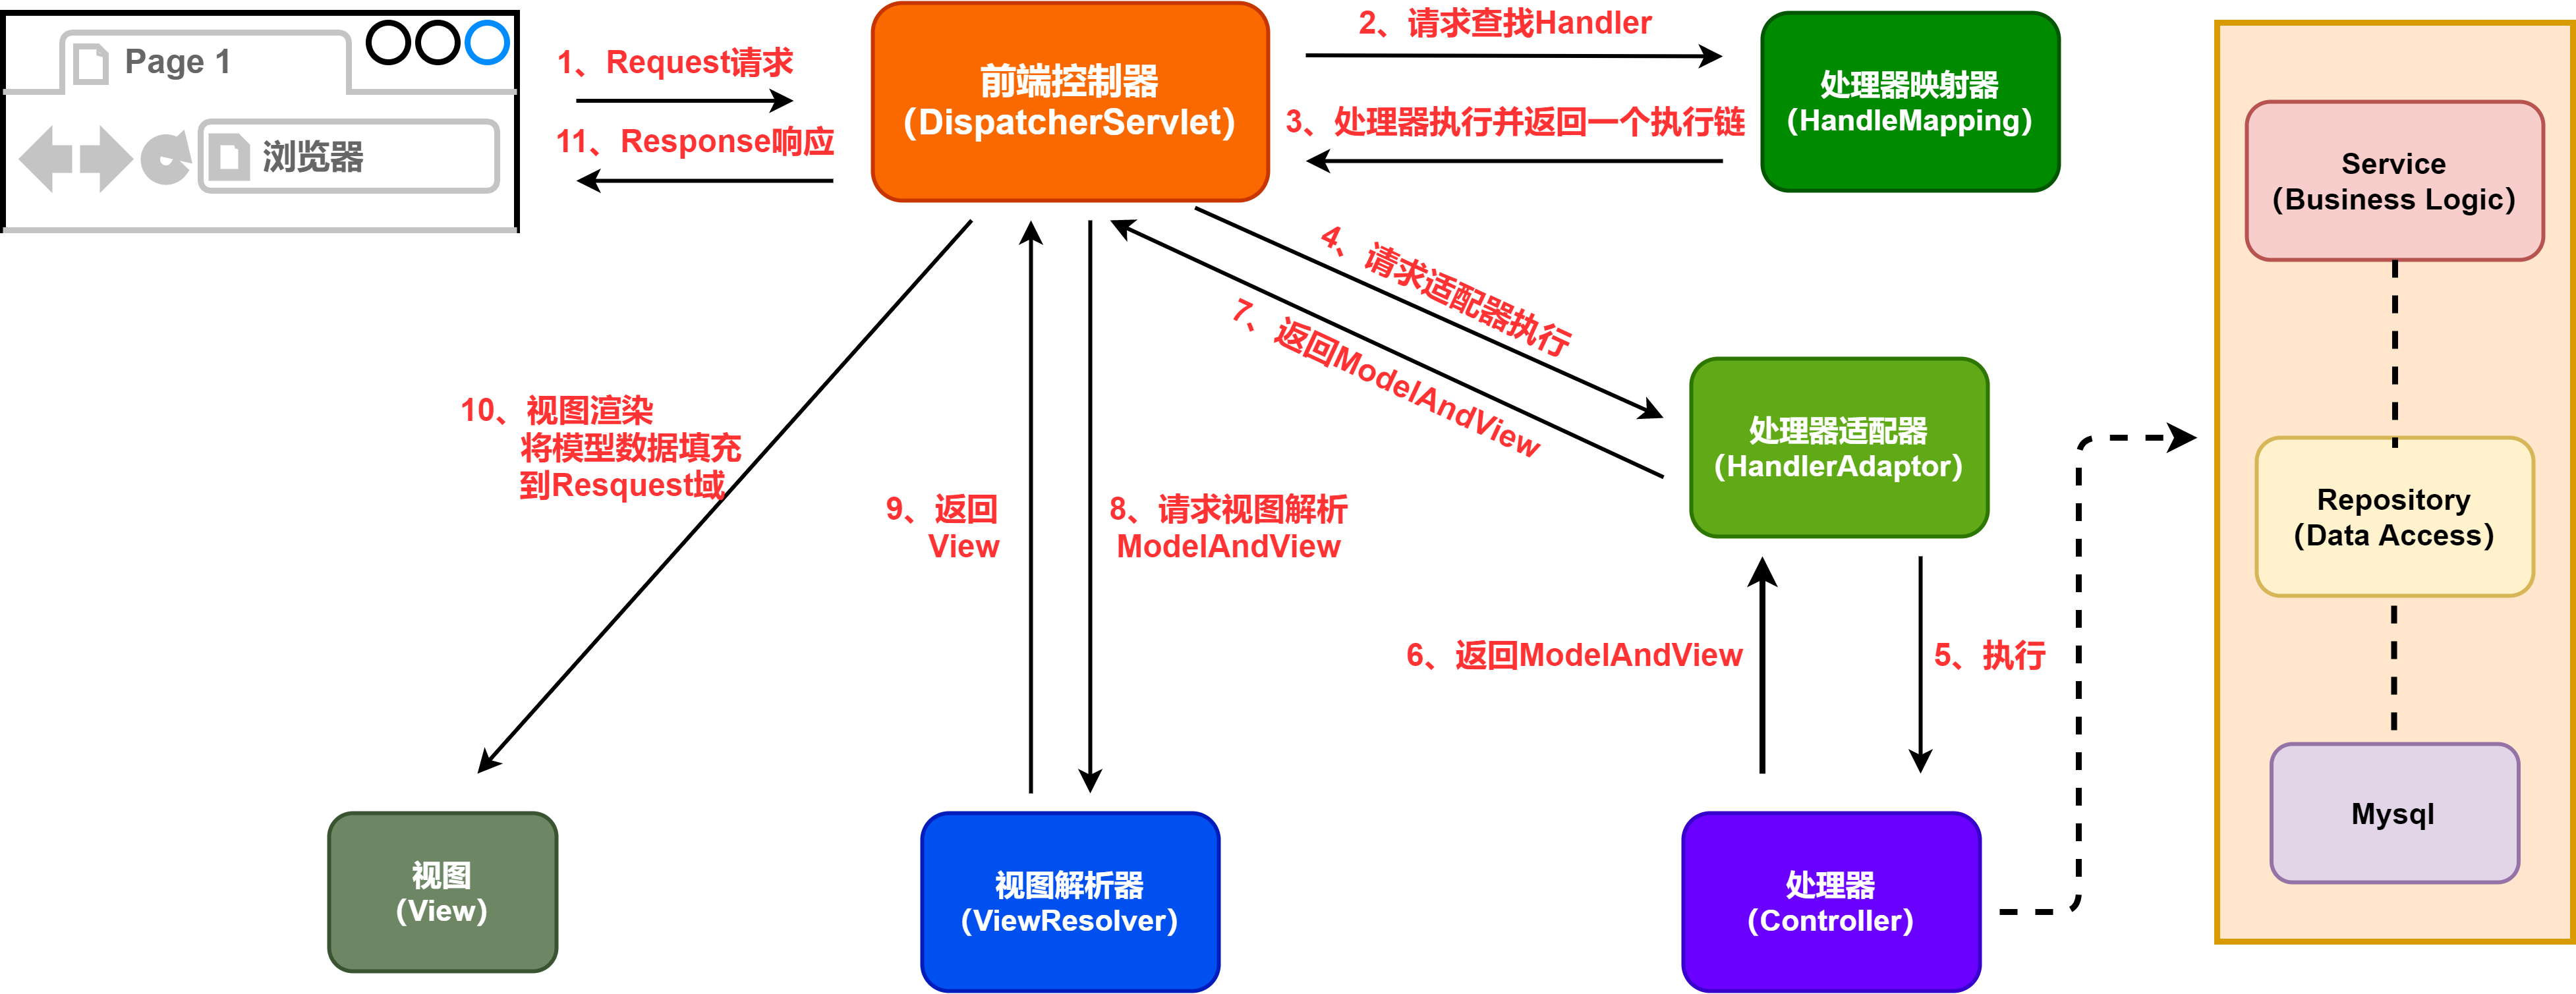
​ 当发起请求时被前端控制器拦截到请求,根据请求参数生成代理请求,找到请求对应的实际控制器,控制器处理请求,创建数据模型,访问数据库,将模型响应给前端控制器,控制器使用模型与视图渲染视图结果,将结果返回给中心控制器,再将结果返回给请求者。
DispatcherServlet:前端控制器

用户请求到达前端控制器,它就相当于mvc模式中的c,dispatcherServlet是整个流程控制的中心,由它调用其它组件处理用户的请求,dispatcherServlet的存在降低了组件之间的耦合性。

HandlerMapping:处理器映射器

HandlerMapping负责根据用户请求找到Handler即处理器,SpringMVC提供了不同的映射器实现不同的映射方式,例如:配置文件方式,实现接口方式,注解方式等。

Handler:处理器

它就是我们开发中要编写的具体业务控制器。由DispatcherServlet把用户请求转发到Handler。由Handler对具体的用户请求进行处理

HandlAdapter:处理器适配器

通过HandlerAdapter对处理器进行执行,这是适配器模式的应用,通过扩展适配器可以对更多类型的处理器进行执行。

View Resolver:视图解析器

View Resolver负责将处理结果生成View视图,View Resolver首先根据逻辑视图名解析成物理视图名即具体的页面地址,再生成View视图对象,最后对View进行渲染将处理结果通过页面展示给用户。

View:视图

SpringMVC框架提供了很多的View视图类型的支持,包括:jstlView、freemarkerView、pdfView等。我们最常用的视图就是jsp。 一般情况下需要通过页面标签或页面模版技术将模型数据通过页面展示给用户,需要由程序员根据业务需求开发具体的页面。

<mvc:annotation-driven>说明

在SpringMVC的各个组件中,处理器映射器、处理器适配器、视图解析器称为SpringMVC的三大组件。

使用<mvc:annotation-driven>自动加载RequestMappingHandlerMapping(处理映射器)和RequestMappingHandlerAdapter(处理适配器),可用在SpringMVC.xml配置文件中使用<mvc:annotation-driven>替代注解处理器和适配器的配置。

SpringMVC执行流程
执行流程简单分析 :

1、DispatcherServlet表示前端控制器,是整个SpringMVC的控制中心。用户发出请求,DispatcherServlet接收请求并拦截请求。

我们假设请求的url为 : http://localhost:8080/SpringMVC/hello

如上url拆分成三部分:

通过分析,如上url表示为:请求位于服务器localhost:8080上的SpringMVC站点的hello控制器。

2、中央调度器(DispatcherServlet)直接将请求转给处理映射器(HandlerMapping);

3、处理器映射(HandlerMapping)会根据请求url查找处理该请求的处理器(Handler),如上url被查找控制器为:hello。并将其封装为执行链后 返回给中央调度器;

4、中央调度器(DispatcherServlet)根据处理执行链中的处理器,找到能够执行该处理器的处理器适配器(HandlerAdapter)

5、处理器适配器(HandlerAdapter)按照特定的规则去执行Handler,Handler让具体的Controller执行。

6、处理器(Controller)将处理结果以及要跳转的视图封装到一个对象ModelAndView中,并将其返回给处理器适配器(HandlerAdapter)

7、处理器适配器(HandlerAdapter)将视图逻辑名或模型传递给DispatcherServlet;

8、中央调度器(DispatcherServlet)调用视图解析器(ViewResolver)来解析HandlerAdapter传递的逻辑视图名。

9、视图解析器将ModelAndView中的视图名称封装为View对象并传给DispatcherServlet;

10、中央调度器(DispatcherServlet)根据视图解析器解析的视图结果,调用具体的视图。让其自己进行渲染,即进行数据填充,形成响应对象

11、中央调度器(DispatcherServlet)响应浏览器

2.3 入门案例-XML配置

项目结构:
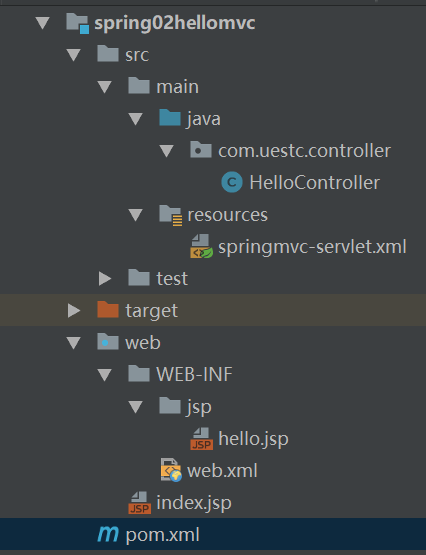
1、新建一个Moudle , spring02hellomvc , 添加web的支持!

2、确定导入了SpringMVC 的依赖!

3、配置web.xml , 注册DispatcherServlet

1
2
3
4
5
6
7
8
9
10
11
12
13
14
15
16
17
18
19
20
21
22
23
24
25
26
27
<?xml version="1.0" encoding="UTF-8"?>
<web-app xmlns="http://xmlns.jcp.org/xml/ns/javaee"
xmlns:xsi="http://www.w3.org/2001/XMLSchema-instance"
xsi:schemaLocation="http://xmlns.jcp.org/xml/ns/javaee http://xmlns.jcp.org/xml/ns/javaee/web-app_4_0.xsd"
version="4.0">

<!--1.注册DispatcherServlet-->
<servlet>
<servlet-name>springmvc</servlet-name>
<servlet-class>org.springframework.web.servlet.DispatcherServlet</servlet-class>
<!--关联一个springmvc的配置文件:【servlet-name】-servlet.xml-->
<init-param>
<param-name>contextConfigLocation</param-name>
<param-value>classpath:springmvc-servlet.xml</param-value>
</init-param>
<!--启动级别-1-->
<load-on-startup>1</load-on-startup>
</servlet>

<!--/ 匹配所有的请求;(不包括.jsp)-->
<!--/* 匹配所有的请求;(包括.jsp)-->
<servlet-mapping>
<servlet-name>springmvc</servlet-name>
<url-pattern>/</url-pattern>
</servlet-mapping>

</web-app>

4、编写SpringMVC 的 配置文件!名称:springmvc-servlet.xml : [servletname]-servlet.xml

1
2
3
4
5
6
7
8

<?xml version="1.0" encoding="UTF-8"?>
<beans xmlns="http://www.springframework.org/schema/beans"
xmlns:xsi="http://www.w3.org/2001/XMLSchema-instance"
xsi:schemaLocation="http://www.springframework.org/schema/beans
http://www.springframework.org/schema/beans/spring-beans.xsd">

</beans>

5、添加处理映射器

1
<bean class="org.springframework.web.servlet.handler.BeanNameUrlHandlerMapping"/>

6、添加 处理器适配器

1
<bean class="org.springframework.web.servlet.mvc.SimpleControllerHandlerAdapter"/>

7、添加 视图解析器

1
2
3
4
5
6
7
<!--视图解析器:DispatcherServlet给他的ModelAndView-->
<bean class="org.springframework.web.servlet.view.InternalResourceViewResolver" id="InternalResourceViewResolver">
<!--前缀-->
<property name="prefix" value="/WEB-INF/jsp/"/>
<!--后缀-->
<property name="suffix" value=".jsp"/>
</bean>

8、编写我们要操作业务Controller ,要么实现Controller接口,要么增加注解;需要返回一个ModelAndView,装数据,封视图;

1
2
3
4
5
6
7
8
9
10
11
12
13
14
15
16
17
package com.uestc.controller;
import org.springframework.web.servlet.ModelAndView;
import org.springframework.web.servlet.mvc.Controller;
import javax.servlet.http.HttpServletRequest;
import javax.servlet.http.HttpServletResponse;
public class HelloController implements Controller {
public ModelAndView handleRequest(HttpServletRequest request, HttpServletResponse response) throws Exception {
//ModelAndView 模型和视图
ModelAndView mv = new ModelAndView();

//封装对象,放在ModelAndView中。Model
mv.addObject("msg","HelloSpringMVC!");
//封装要跳转的视图,放在ModelAndView中
mv.setViewName("hello"); //: /WEB-INF/jsp/hello.jsp
return mv;
}
}

9、将自己的类交给SpringIOC容器,注册bean

1
2
<!--Handler-->
<bean id="/hello" class="com.kuang.controller.HelloController"/>

10、写要跳转的jsp页面,显示ModelandView存放的数据,以及我们的正常页面;

1
2
3
4
5
6
7
8
9
<%@ page contentType="text/html;charset=UTF-8" language="java" %>
<html>
<head>
<title>Kuangshen</title>
</head>
<body>
${msg}
</body>
</html>

11、配置Tomcat 启动测试!

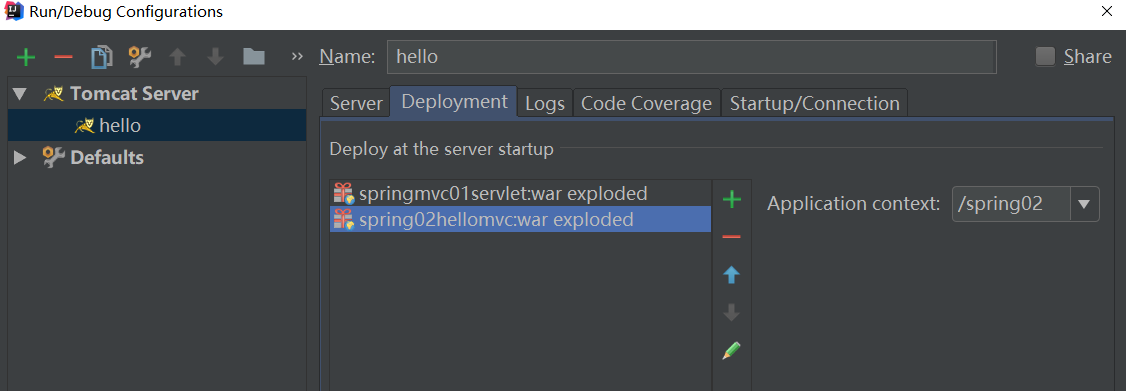
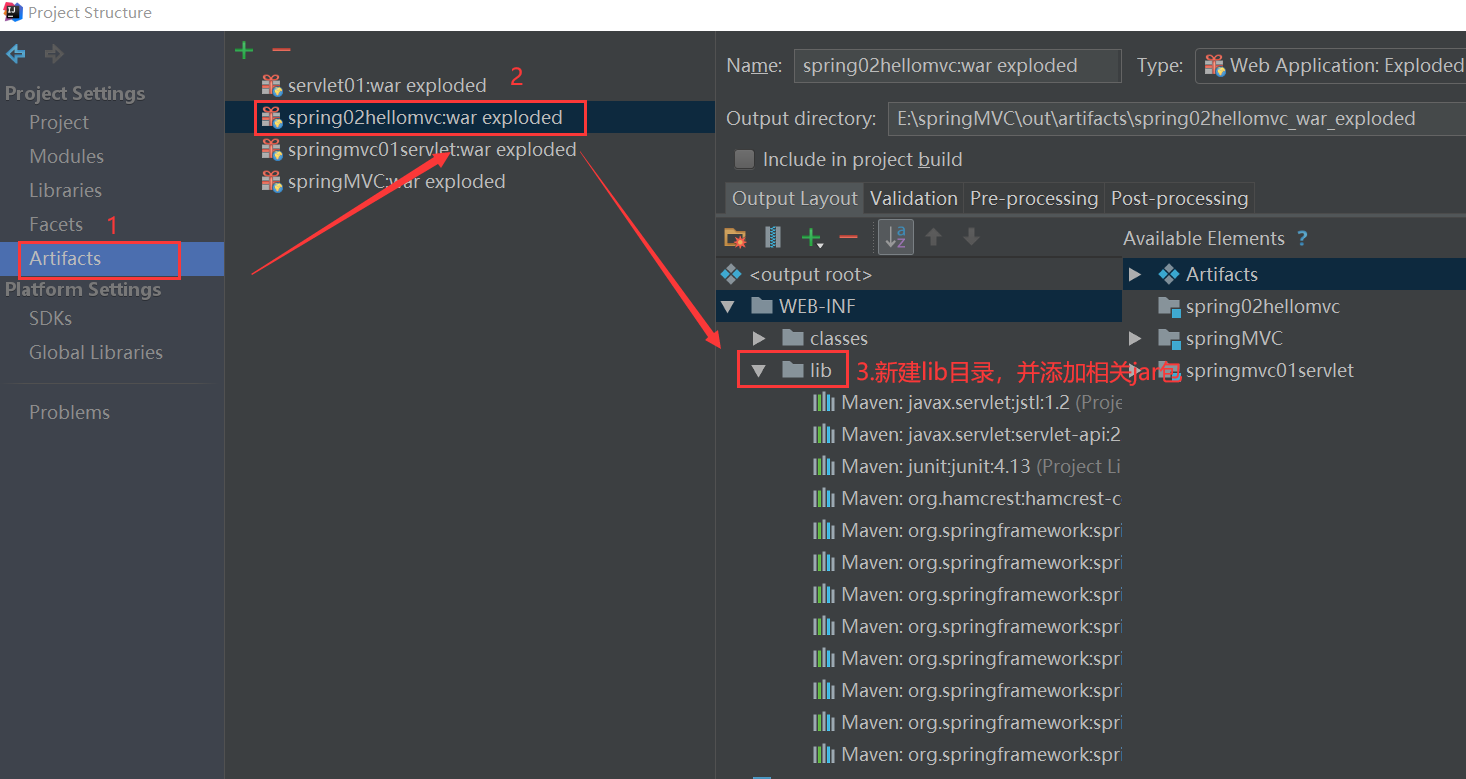
可能遇到的问题:访问出现404,排查步骤:

  1. 查看控制台输出,看一下是不是缺少了什么jar包。
  2. 如果jar包存在,显示无法输出,就在IDEA的项目发布中,添加lib依赖!
  3. 重启Tomcat 即可解决!

2.4 入门案例-注解配置

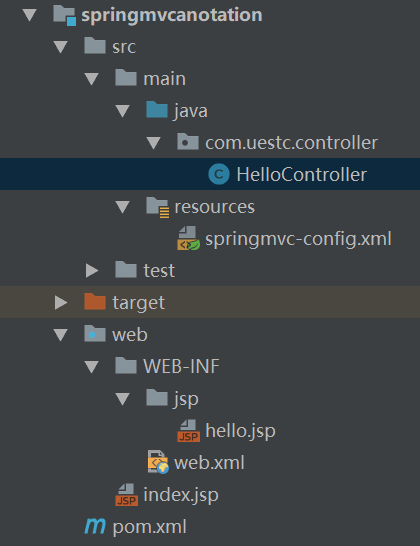
项目结构:

1、新建一个Moudle,springmvc-03-hello-annotation 。添加web支持!

2、在pom.xml文件引入相关的依赖:主要有Spring框架核心库、Spring MVC、servlet , JSTL等。我们在父依赖中已经引入了!

3、配置web.xml

1
2
3
4
5
6
7
8
9
10
11
12
13
14
15
16
17
18
19
20
21
22
23
24
25
26
<?xml version="1.0" encoding="UTF-8"?>
<web-app xmlns="http://xmlns.jcp.org/xml/ns/javaee"
xmlns:xsi="http://www.w3.org/2001/XMLSchema-instance"
xsi:schemaLocation="http://xmlns.jcp.org/xml/ns/javaee http://xmlns.jcp.org/xml/ns/javaee/web-app_4_0.xsd"
version="4.0">

<!--1.注册servlet-->
<servlet>
<servlet-name>SpringMVC</servlet-name>
<servlet-class>org.springframework.web.servlet.DispatcherServlet</servlet-class>
<!--通过初始化参数指定SpringMVC配置文件的位置,进行关联-->
<init-param>
<param-name>contextConfigLocation</param-name>
<param-value>classpath:springmvc-servlet.xml</param-value>
</init-param>
<!-- 启动顺序,数字越小,启动越早 -->
<load-on-startup>1</load-on-startup>
</servlet>

<!--所有请求都会被springmvc拦截 -->
<servlet-mapping>
<servlet-name>SpringMVC</servlet-name>
<url-pattern>/</url-pattern>
</servlet-mapping>

</web-app>

注意的问题:

  • / 和 /* 的区别:

    < url-pattern > / </ url-pattern > 不会匹配到.jsp, 只针对我们编写的请求;即:.jsp 不会进入spring的 DispatcherServlet类 。

    < url-pattern > /* </ url-pattern > 会匹配 *.jsp,会出现返回 jsp视图 时再次进入spring的DispatcherServlet 类,导致找不到对应的controller所以报404错。

  • 注意web.xml版本问题,要最新版!

  • 注册DispatcherServlet

  • 关联SpringMVC的配置文件

  • 启动级别为1

  • 映射路径为/【不要用/*,会404】

4、添加Spring MVC配置文件

resource目录下添加springmvc-servlet.xml配置文件,配置的形式与Spring容器配置基本类似,为了支持基于注解的IOC,设置了自动扫描包的功能,具体配置信息如下:

1
2
3
4
5
6
7
8
9
10
11
12
13
14
15
16
17
18
19
20
21
22
23
24
25
26
27
28
29
30
31
32
33
34
<?xml version="1.0" encoding="UTF-8"?>
<beans xmlns="http://www.springframework.org/schema/beans"
xmlns:xsi="http://www.w3.org/2001/XMLSchema-instance"
xmlns:context="http://www.springframework.org/schema/context"
xmlns:mvc="http://www.springframework.org/schema/mvc"
xsi:schemaLocation="http://www.springframework.org/schema/beans
http://www.springframework.org/schema/beans/spring-beans.xsd
http://www.springframework.org/schema/mvc
http://www.springframework.org/schema/mvc/spring-mvc.xsd
http://www.springframework.org/schema/context
http://www.springframework.org/schema/context/spring-context.xsd">

<!-- 自动扫描包,让指定包下的注解生效,由IOC容器统一管理 -->
<context:component-scan base-package="com.uestc.controller"></context:component-scan>
<!-- 让Spring MVC不处理静态资源 -->
<mvc:default-servlet-handler />

<!--
支持mvc注解驱动
在spring中一般采用@RequestMapping注解来完成映射关系
要想使@RequestMapping注解生效
必须向上下文中注册DefaultAnnotationHandlerMapping
和一个AnnotationMethodHandlerAdapter实例
这两个实例分别在类级别和方法级别处理。
而annotation-driven配置帮助我们自动完成上述两个实例的注入。
-->
<mvc:annotation-driven />

<!-- 视图解析器 -->
<bean class="org.springframework.web.servlet.view.InternalResourceViewResolver">
<property name="prefix" value="/WEB-INF/jsp/"></property>
<property name="suffix" value=".jsp"></property>
</bean>
</beans>

注意:

  • 在视图解析器中我们把所有的视图都存放在/WEB-INF/目录下,这样可以保证视图安全,因为这个目录下的文件,客户端不能直接访问。

  • 让IOC的注解生效

  • 静态资源过滤 :HTML . JS . CSS . 图片 , 视频 …..

  • MVC的注解驱动

  • 配置视图解析器

5、创建Controller

编写一个Java控制类:com.kuang.controller.HelloController , 注意编码规范

1
2
3
4
5
6
7
8
9
10
11
12
13
14
15
16
package com.uestc.controller;
import org.springframework.stereotype.Controller;
import org.springframework.ui.Model;
import org.springframework.web.bind.annotation.RequestMapping;
@Controller
@RequestMapping("/helloController")
public class HelloController {
@RequestMapping("/hello")
public String sayHello(Model model){
//真实访问地址 : 项目名/HelloController/hello
//向模型中添加属性msg与值,可以在JSP页面中取出并渲染
model.addAttribute("msg","hello,springMVC");
//web-inf/jsp/hello.jsp
return "hello";
}
}
  • @Controller是为了让Spring IOC容器初始化时自动扫描到;
  • @RequestMapping是为了映射请求路径,这里因为类与方法上都有映射所以访问时应该是/HelloController/hello
  • 方法中声明Model类型的参数是为了把Action中的数据带到视图中;
  • 方法返回的结果是视图的名称hello,加上配置文件中的前后缀变成WEB-INF/jsp/hello.jsp

6、创建视图层

WEB-INF/ jsp目录中创建hello.jsp , 视图可以直接取出并展示从Controller带回的信息;

可以通过EL表示取出Model中存放的值,或者对象;

1
2
3
4
5
6
7
8
9
10
11
12
13
14
15
16
<%--
Created by IntelliJ IDEA.
User: Liu Fei
Date: 2020/12/29
Time: 14:22
To change this template use File | Settings | File Templates.
--%>
<%@ page contentType="text/html;charset=UTF-8" language="java" %>
<html>
<head>
<title>liufei </title>
</head>
<body>
${msg}
</body>
</html>

7、配置Tomcat运行

配置Tomcat ,开启服务器 , 访问 对应的请求路径!

2.5 小结

实现步骤其实非常的简单:

  1. 新建一个web项目
  2. 导入相关jar包
  3. 编写web.xml , 注册DispatcherServlet
  4. 编写springmvc配置文件
  5. 接下来就是去创建对应的控制类 , controller
  6. 最后完善前端视图和controller之间的对应
  7. 测试运行调试.

使用springMVC必须配置的三大件:

处理器映射器、处理器适配器、视图解析器

通常,我们只需要手动配置视图解析器,而处理器映射器处理器适配器只需要开启注解驱动即可,而省去了大段的xml配置

2.6 控制器开发

控制器开发是springMVC的核心内容,主要包括三个步骤“

  • 获取请求参数

  • 处理业务逻辑

  • 绑定模型和视图

2.61 控制器Controller的实现方法

1、控制器复杂提供访问应用程序的行为,通常通过接口定义注解定义两种方法实现。

2、控制器负责解析用户的请求并将其转换为一个模型。

3、在Spring MVC中一个控制器类可以包含多个方法

4、在Spring MVC中,对于Controller的配置方式有很多种

方式一、实现Controller接口

Controller是一个接口,在org.springframework.web.servlet.mvc包下,接口中只有一个方法;

1
2
3
4
5
//实现该接口的类获得控制器功能
public interface Controller {
//处理请求且返回一个模型与视图对象
ModelAndView handleRequest(HttpServletRequest var1, HttpServletResponse var2) throws Exception;
}
  1. 新建一个Moudle, mvc的配置文件只留下视图解析器!

    1
    2
    3
    4
    5
    6
    7
    8
    9
    10
    <?xml version="1.0" encoding="UTF-8"?>
    <beans xmlns="http://www.springframework.org/schema/beans"
    xmlns:xsi="http://www.w3.org/2001/XMLSchema-instance"
    xsi:schemaLocation="http://www.springframework.org/schema/beans http://www.springframework.org/schema/beans/spring-beans.xsd">

    <bean class="org.springframework.web.servlet.view.InternalResourceViewResolver">
    <property name="prefix" value="/WEB-INF/jsp/"></property>
    <property name="suffix" value=".jsp"></property>
    </bean>
    </beans>
  2. 编写一个Controller类,ControllerTest1

    1
    2
    3
    4
    5
    6
    7
    8
    9
    10
    11
    12
    13
    14
    15
    //定义控制器
    //注意点:不要导错包,实现Controller接口,重写方法;
    package com.uestc.controller;
    import org.springframework.web.servlet.ModelAndView;
    import org.springframework.web.servlet.mvc.Controller;
    import javax.servlet.http.HttpServletRequest;
    import javax.servlet.http.HttpServletResponse;
    public class ControllerTest1 implements Controller{
    public ModelAndView handleRequest(HttpServletRequest httpServletRequest, HttpServletResponse httpServletResponse) throws Exception {
    ModelAndView mv=new ModelAndView();
    mv.addObject("msg","hello,springmvc");
    mv.setViewName("test");
    return mv;
    }
    }
  3. 编写完毕后,去Spring配置文件中注册请求的bean;name对应请求路径,class对应处理请求的类

    1
    <bean id="/t1" class="com.uestc.controller.ControllerTest1"></bean>
  4. 编写前端test.jsp,注意在WEB-INF/jsp目录下编写,对应我们的视图解析器

    1
    2
    3
    4
    5
    6
    7
    8
    9
    10
    11
    12
    13
    14
    15
    16
    <%--
    Created by IntelliJ IDEA.
    User: Liu Fei
    Date: 2020/12/29
    Time: 15:55
    To change this template use File | Settings | File Templates.
    --%>
    <%@ page contentType="text/html;charset=UTF-8" language="java" %>
    <html>
    <head>
    <title>Title</title>
    </head>
    <body>
    ${msg}
    </body>
    </html>
  5. 配置Tomcat运行测试,我这里没有项目发布名配置的就是一个 / ,所以请求不用加项目名,OK!

说明:

  • 实现接口Controller定义控制器是较老的办法
  • 缺点是:一个控制器中只有一个方法,如果要多个方法则需要定义多个Controller;定义的方式比较麻烦;
方式二、使用注解@Controller

@Controller注解类型用于声明Spring类的实例是一个控制器(在讲IOC时还提到了另外3个注解);

  1. Spring可以使用扫描机制来找到应用程序中所有基于注解的控制器类,为了保证Spring能找到你的控制器,需要在配置文件中声明组件扫描。
1
<context:component-scan base-package="com.uestc.controller"></context:component-scan>
  1. 增加一个ControllerTest, 使用注解实现;

    1
    2
    3
    4
    5
    6
    7
    8
    9
    10
    11
    12
    13
    14
    15
    16
    package com.uestc.controller;
    import org.springframework.stereotype.Controller;
    import org.springframework.ui.Model;
    import org.springframework.web.bind.annotation.RequestMapping;
    //@Controller注解的类会自动添加到Spring上下文中
    @Controller
    public class ControllerTest1 {
    //映射访问路径
    @RequestMapping("/hello")
    public String sayHello(Model model){
    //Spring MVC会自动实例化一个Model对象用于向视图中传值
    model.addAttribute("msg","hello,springmvc");
    //返回视图位置
    return "test";
    }
    }
  2. 运行tomcat测试

2.62 RequestMapping注解

作用:

@RequestMapping注解用于映射url到控制器类或一个特定的处理程序方法。

用于建立请求URL和处理请求方法之间的对应关系。

作用位置:

可用于类或方法上。用于类上,表示类中的所有响应请求的方法都是以该地址作为父路径

  • 注解在类上

    请求URL的第一级访问目录。此处不写的话,就相当于应用的根目录。写的话需要以/开头。 它出现的目的是为了使我们的URL可以按照模块化管理:

    1
    2
    3
    4
    5
    6
    7
    8
    @Controller
    @RequestMapping("/admin")
    public class TestController {
    @RequestMapping("/h1")
    public String test(){
    return "test";
    }
    }

    访问路径:http://localhost:8080 / 项目名/ admin /h1 , 需要先指定类的路径再指定方法的路径;

  • 注解在方法上

    请求URL的第二级访问目录。

    1
    2
    3
    4
    5
    6
    7
    @Controller
    public class TestController {
    @RequestMapping("/h1")
    public String test(){
    return "test";
    }
    }

    访问路径:http://localhost:8080 / 项目名 / h1

属性

  • value:用于指定请求的URL。它和path属性的作用是一样的。

  • method:用于指定请求的方式。

  • params:用于指定限制请求参数的条件。它支持简单的表达式。要求请求参数的key和value必须和配置的一模一样。 例如: params = {"accountName"},表示请求参数必须有accountName params = {"moeny!100"},表示请求参数中money不能是100。

  • headers:用于指定限制请求消息头的条件。

注意: 以上四个属性只要出现2个或以上时,他们的关系是与的关系

method属性示例

用于约束请求的类型,可以收窄请求范围。指定请求谓词的类型如GET, POST, HEAD, OPTIONS, PUT, PATCH, DELETE, TRACE等

即只有满足该 method属性指定的提交方式请求,才会执行该被注解法。
Method属性的取值为RequestMethod枚举常量。常用的为枚举常量RequestMethod.GET与 RequestMethod.POST,分别表示提交方式的匹配规则为 GET与 POST提交。

1
2
3
4
5
6
//映射访问路径,必须是POST请求
@RequestMapping(value = "/hello",method = {RequestMethod.POST})
public String index2(Model model){
model.addAttribute("msg", "hello!");
return "test";
}

以上处理器方法只能以上处理POST方式提交的请求方式提交的请求。客户端浏览器常用的请求方式及其 提交方式有以下几种:

也就是说,只要指定了处理器方法匹配的请求提交式为POST,则相当于指定了请求发送的方式 :要么使用 表单请求,要么使用AJAX请求。 其它方式被禁用请求。 否则出现以下错误
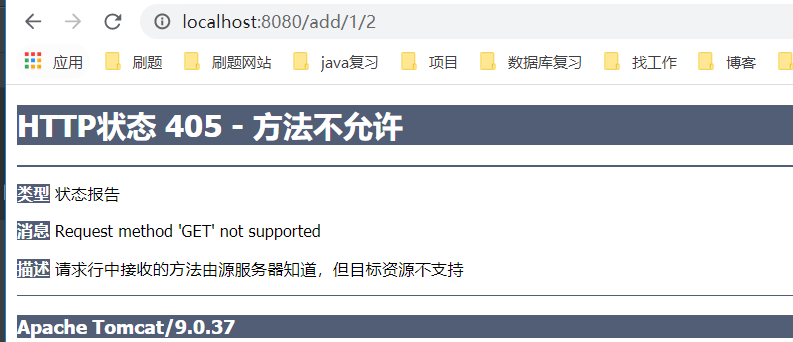
当然,若不指定 method属性,则无论是 属性,则无论是 GET还是 POST提交方式,均可匹配。即对于 提交方式,均可匹配。

  1. 新建处理器Mycontroller

    1
    2
    3
    4
    5
    6
    7
    8
    9
    10
    11
    12
    13
    14
    15
    16
    17
    18
    19
    20
    21
    package com.uestc.controller;
    import org.springframework.stereotype.Controller;
    import org.springframework.ui.Model;
    import org.springframework.web.bind.annotation.RequestMapping;
    import org.springframework.web.bind.annotation.RequestMethod;

    @Controller
    @RequestMapping("/test2")
    public class Mycontroller {
    @RequestMapping(value = "/doSome",method = RequestMethod.GET)
    public String doSome(Model model){
    model.addAttribute("msg","跳转到doSome页面");
    return "test";
    }

    @RequestMapping(value="/doOther",method = RequestMethod.POST)
    public String doOther(Model model){
    model.addAttribute("msg","跳转到doOther页面");
    return "test";
    }
    }
  2. 修改index.jsp页面

    1
    2
    3
    4
    5
    6
    7
    8
    9
    10
    11
    12
    13
    14
    15
    16
    17
    18
    19
    20
    21
    22
    23
    <%--
    Created by IntelliJ IDEA.
    User: Liu Fei
    Date: 2020/12/29
    Time: 15:50
    To change this template use File | Settings | File Templates.
    --%>
    <%@ page contentType="text/html;charset=UTF-8" language="java" %>
    <html>
    <head>
    <title>$Title$</title>
    </head>
    <body>
    <a href="/test2/doSome">跳转到doSome页面</a>
    <br>
    <form action="/test2/doSome/" method="GET">
    <input type="submit" value="跳转到doSome页面">
    </form>
    <form action="/test2/doOther/" method="POST">
    <input type="submit" value="跳转到doOther页面">
    </form>
    </body>
    </html>
  3. 配置tomcat并启动

2.63 处理器方法的参数绑定

处理器方法可以包含以下四类参数,这些参数会在系统调用时由系统自动赋值,即程序员可在方法内直接使用

  • HttpServletRequest
  • HttpServletResponse
  • HttpSession
  • 请求中所携带的请求参数

我们都知道,表单中请求参数都是基于key=value的。 SpringMVC绑定请求参数的过程是通过把表单提交请求参数,作为控制器中方法参数进行绑定的。

例如:下面超链接中的请求参数是accountId=10

step1: index页面中包含如下超链接

1
<a href="account/findAccount?accountId=10">查询账户</a>

step2: 处理器类Mycontroller

1
2
3
4
5
6
7
8
9
@Controller
@RequestMapping("/test2")
public class Mycontroller {
@RequestMapping("/hello")
public String findAccount(Integer accountId){
System.out.println("查询了账户"+accountId);
return "test";
}
}

step3: 在WEB-INF/jsp下添加test.jsp页面

1
2
3
4
5
6
7
8
9
<%@ page contentType="text/html;charset=UTF-8" language="java" %>
<html>
<head>
<title>Title</title>
</head>
<body>
<a>hello,springMVC</a>
</body>
</html>

step4: 配置tomcat服务器并启动,访问http://localhost:8080/

2.631 支持的数据类型
  • 基本类型参数: 包括基本类型和String类型

  • POJO类型参数: 包括实体类,以及关联的实体类

  • 数组和集合类型参数: 包括List结构和Map结构的集合(包括数组)

2.632 使用要求

SpringMVC绑定请求参数是自动实现的,但是要想使用,必须遵循使用要求:

  1. 如果是基本类型或者String类型: 要求我们的参数名称必须和控制器中方法的形参名称保持一致。(严格区分大小写)

  2. 如果是POJO类型,或者它的关联对象: 要求表单中参数名称和POJO类的属性名称保持一致。并且控制器方法的参数类型是POJO类型。

  3. 如果是集合类型,有两种方式:

    第一种: 要求集合类型的请求参数必须在POJO中。在表单中请求参数名称要和POJO中集合属性名称相同。 给List集合中的元素赋值,使用下标。 给Map集合中的元素赋值,使用键值对。

    第二种: 接收的请求参数是json格式数据。需要借助一个注解实现。

2.633 示例:
基本类型和String类型作为参数

step1: index页面有如下超链接:

1
<a href="/test2/hello?accountId=10&accountName=liufei">查询账户</a>

step2: 控制器代码

1
2
3
4
5
6
7
8
9
@Controller
@RequestMapping("/test2")
public class Mycontroller {
@RequestMapping("/hello")
public String findAccount(Integer accountId, String accountName){
System.out.println("查询了"+accountName+"的账户id"+accountId);
return "test";
}
}

step3: 启动tomcat服务器

POJO类型作为参数

step1: index页面

1
2
3
4
5
6
7
8
9
10
11
12
13
14
15
16
<%@ page contentType="text/html;charset=UTF-8" language="java" %>
<html>
<head>
<title>$Title$</title>
</head>
<body>
<form action="test2/hello" method="post">
账户id: <input type="text" name="id" ><br/>
账户姓名: <input type="text" name="name"><br/>
账户金额: <input type="text" name="money"><br/>
账户省份: <input type="text" name="address.provinceName"><br/>
账户城市: <input type="text" name="address.cityName"><br/>
<input type="submit" value="保存">
</form>
</body>
</html>

step2: Account实体类和Adress实体类

Account实体类:

1
2
3
4
5
6
7
8
9
10
11
12
13
14
15
16
17
18
19
20
21
22
23
24
25
26
27
28
29
30
31
32
33
34
35
36
37
38
39
40
41
42
43
44
45
46
47
48
49
package domain;
import java.io.Serializable;
public class Account implements Serializable{
private Integer id;
private String name;
private Float money;
private Address address;
public Integer getId() {
return id;
}

public void setId(Integer id) {
this.id = id;
}

public String getName() {
return name;
}

public void setName(String name) {
this.name = name;
}

public Float getMoney() {
return money;
}

public void setMoney(Float money) {
this.money = money;
}

public Address getAddress() {
return address;
}

public void setAddress(Address address) {
this.address = address;
}

@Override
public String toString() {
return "Account{" +
"id=" + id +
", name='" + name + '\'' +
", money=" + money +
", address=" + address +
'}';
}
}

Adress实体类:

1
2
3
4
5
6
7
8
9
10
11
12
13
14
15
16
17
18
19
20
21
22
23
24
25
26
27
28
29
30
31
package domain;
import java.io.Serializable;

public class Address implements Serializable {
private String provinceName;
private String cityName;

public String getProvinceName() {
return provinceName;
}

public void setProvinceName(String provinceName) {
this.provinceName = provinceName;
}

public String getCityName() {
return cityName;
}

public void setCityName(String cityName) {
this.cityName = cityName;
}

@Override
public String toString() {
return "Address{" +
"provinceName='" + provinceName + '\'' +
", cityName='" + cityName + '\'' +
'}';
}
}

step3: 控制器代码

1
2
3
4
5
6
7
8
9
@Controller
@RequestMapping("/test2")
public class Mycontroller {
@RequestMapping("/hello")
public String saveAccount(Account account){
System.out.println(account);
return "test";
}
}

step4: 启动tomcat服务器

POJO类中包含集合类型参数

step1: index页面

1
2
3
4
5
6
7
8
9
10
11
12
13
14
15
16
17
18
19
20
21
22
23
24
25
26
27
28
29
30
31
32
33
34
35
36
37
38
<html>
<head>
<title>$Title$</title>
</head>
<body>
<form action="test2/hello" method="post">
用户名称:<input type="text" name="username" ><br/>
用户密码: <input type="password" name="password"><br/>
用户年龄:<input type="text" name="age"><br/>
账户1id:<input type="text" name="accounts[0].id"><br/>
账户1名称:<input type="text" name="accounts[0].name"><br/>
账户1金额: <input type="text" name="accounts[0].money"><br/>
账户1省份: <input type="text" name="accounts[0].address.provinceName"><br/>
账户1城市: <input type="text" name="accounts[0].address.cityName"><br/>

账户2id:<input type="text" name="accounts[1].id"><br/>
账户2名称:<input type="text" name="accounts[1].name"><br/>
账户2金额: <input type="text" name="accounts[1].money"><br/>
账户2省份: <input type="text" name="accounts[1].address.provinceName"><br/>
账户2城市: <input type="text" name="accounts[1].address.cityName"><br/>

账户3id:<input type="text" name="accountMap[one].id"><br/>
账户3名称:<input type="text" name="accountMap[one].name"><br/>
账户3金额: <input type="text" name="accountMap[one].money"><br/>
账户3省份: <input type="text" name="accountMap[one].address.provinceName"><br/>
账户3城市: <input type="text" name="accountMap[one].address.cityName"><br/>

账户4id:<input type="text" name="accountMap[two].id"><br/>
账户4名称:<input type="text" name="accountMap[two].name"><br/>
账户4金额: <input type="text" name="accountMap[two].money"><br/>
账户4省份: <input type="text" name="accountMap[two].address.provinceName"><br/>
账户4城市: <input type="text" name="accountMap[two].address.cityName"><br/>

<input type="submit" value="保存">
</form>

</body>
</html>

step2: User实体类

1
2
3
4
5
6
7
8
9
10
11
12
13
14
15
16
17
18
19
20
21
22
23
24
25
26
27
28
29
30
31
32
33
34
35
36
37
38
39
40
41
42
43
44
45
46
47
48
49
50
51
52
53
54
55
56
57
58
59
60
61
62
package domain;

import java.io.Serializable;
import java.util.List;
import java.util.Map;

public class User implements Serializable {
private String username;
private String password;
private Integer age;
private List<Account> accounts;
private Map<String,Account> accountMap;

public String getUsername() {
return username;
}

public void setUsername(String username) {
this.username = username;
}

public String getPassword() {
return password;
}

public void setPassword(String password) {
this.password = password;
}

public Integer getAge() {
return age;
}

public void setAge(Integer age) {
this.age = age;
}

public List<Account> getAccounts() {
return accounts;
}

public void setAccounts(List<Account> accounts) {
this.accounts = accounts;
}

public Map<String, Account> getAccountMap() {
return accountMap;
}

public void setAccountMap(Map<String, Account> accountMap) {
this.accountMap = accountMap;
}

@Override
public String toString() {
return "User{" +
"username='" + username + '\'' +
", password='" + password + '\'' +
", age=" + age +
'}';
}
}

step3: 控制器代码:

1
2
3
4
5
6
7
8
9
10
11
@Controller
@RequestMapping("/test2")
public class Mycontroller {
@RequestMapping("/hello")
public String saveAccount(User user){
System.out.println(user);
System.out.println(user.getAccounts());
System.out.println(user.getAccountMap());
return "test";
}
}

step4: 启动tomcat服务器

2.634 请求参数乱码问题

对于前面所接受的请求参数,若含有中文,则会出现中文乱码问题。

Spring对于请求参数中的中文乱码问题,给出了专门的字符集过滤器:spring-web-5.2.5.RELEASE.jar的org.springframework.web.filter包下的FilterCharacterEncodingFilter

解决方案:在web.xml中注册字符集过滤器,即可解决Spring的请求参数的中文乱码问题。

1
2
3
4
5
6
7
8
9
10
11
12
13
14
15
16
17
18
19
20
21
<!-- 注册字符集过滤器:解决post请求乱码的问题 -->
<filter>
<filter-name>CharacterEncodingFilter</filter-name>
<filter-class>org.springframework.web.filter.CharacterEncodingFilter</filter-class>
<!-- 设置过滤器中的属性值 -->
<init-param>
<param-name>encoding</param-name>
<param-value>UTF-8</param-value>
</init-param>

<!-- 启动过滤器 -->
<init-param>
<param-name>forceEncoding</param-name>
<param-value>true</param-value>
</init-param>
</filter>
<!-- 过滤所有请求 -->
<filter-mapping>
<filter-name>CharacterEncodingFilter</filter-name>
<url-pattern>/*</url-pattern>
</filter-mapping>

在springmvc的配置文件中可以配置,静态资源不过滤:

1
2
3
4
<!-- location表示路径,mapping表示文件,**表示该目录下的文件以及子目录的文件 --> 
<mvc:resources location="/css/" mapping="/css/**"/>
<mvc:resources location="/images/" mapping="/images/**"/>
<mvc:resources location="/scripts/" mapping="/javascript/**"/>

特殊情况:

  1. get请求方式: tomacat对GET和POST请求处理方式是不同的,GET请求的编码问题,要改tomcat的server.xml配置文件,如下:

    1
    <Connector connectionTimeout="20000" port="8080" protocol="HTTP/1.1" redirectPort="8443"/>

    改为:

    1
    <Connector connectionTimeout="20000" port="8080" protocol="HTTP/1.1" redirectPort="8443" useBodyEncodingForURI="true"/>
  2. 如果遇到ajax请求仍然乱码,请把: useBodyEncodingForURI="true"改为URIEncoding="UTF-8"即可。

2.635 自定义类型转换器

使用场景:

step1: index界面中超链接部分传入了日期格式

1
<a href="account/deleteAccount?date=2021-01-19">根据日期删除用户</a>

step2: 控制器代码:

1
2
3
4
5
6
7
8
9
@Controller
@RequestMapping("/account")
public class Mycontroller {
@RequestMapping("/deleteAccount")
public String deleteAccount(Date date){
System.out.println("删除了账户"+date);
return "test";
}
}

step3: 启动tomcat服务器

解决方案:

step1: 定义一个类,实现Converter接口,该接口有两个泛型

1
2
3
4
5
6
public interface Converter<S, T>{//S:表示接受的类型,T:表示目标类型 
/**
* 实现类型转换的方法
*/
@Nullable T convert(S source);
}
1
2
3
4
5
6
7
8
9
10
11
12
13
14
15
16
17
public class StringToDateConverter implements Converter<String,Date> {
//用于把String类型转成日期类型
public Date convert(String s) {

DateFormat format;
try {
if(s==null){
throw new RuntimeException("请输入要转换的日期");
}
format=new SimpleDateFormat("yyyy-MM-dd");
Date date=format.parse(s);
return date;
} catch (Exception e) {
throw new RuntimeException("转换失败");
}
}
}

step2: 在spring配置文件中配置类型转换器

spring配置类型转换器的机制是,将自定义的转换器注册到类型转换服务中去

1
2
3
4
5
6
7
8
9
10
 <!-- 配置类型转换器工厂 -->
<bean id="conversionService" class="org.springframework.context.support.ConversionServiceFactoryBean">
<!-- 给工厂注入一个新的类型转换器 -->
<property name="converters">
<set>
<!-- 配置自定义类型转换器 -->
<bean class="com.uestc.controller.StringToDateConverter"></bean>
</set>
</property>
</bean>

step3: 在annotation-driven标签中引用配置的类型转换服务

1
<mvc:annotation-driven conversion-service="conversionService" />

step4: 启动tomcat服务器

2.636 使用ServletAPI对象作为方法参数

SpringMVC还支持使用原始ServletAPI对象作为控制器方法的参数。支持原始ServletAPI对象有:

  • HttpServletRequest
  • HttpServletResponse
  • HttpSession
  • InputStream
  • OutputStream
  • Reader Writer

我们可以把上述对象,直接写在控制的方法参数中使用。

1
2
3
4
5
6
7
8
9
@RequestMapping("/testServletAPI") 
public String testServletAPI(HttpServletRequest request,
HttpServletResponse response,
HttpSession session) {
System.out.println(request);
System.out.println(response);
System.out.println(session);
return "success";
}
2.637 常用注解
1. 校正请求参数名@RequestParam

作用

当请求URL所携带的参数名称与处理方法中指定的参数名称不相同时,则需要在处理方法参数前,添加一个注解@RequestParam("请求参数名"),指定请求URL所携带参数的名称

作用位置:

该注解是对处理器方法参数进行修饰的

属性:

  • value: 请求参数中的名称

  • required:请求参数中是否必须提供此参数。

    默认值:true。表示必须提供,如果不提供将报错

    false, 表示可以没有此参数

使用案例:

step1: 新建param.jsp页面, 注意这里参数name与控制器方法中的参数username不一致

1
2
3
4
5
6
7
8
9
<%@ page contentType="text/html;charset=UTF-8" language="java" %>
<html>
<head>
<title>Title</title>
</head>
<body>
<a href="anno/test_requestparam?name=刘飞">requestparam注解演示</a>
</body>
</html>

step2: 控制器代码

1
2
3
4
5
6
7
8
9
10
11
@Controller
@RequestMapping("/anno")
public class AnnoController {

@RequestMapping("/test_requestparam")
public String test_requestparam(@RequestParam(value = "name") String username,
@RequestParam(value = "age", required=false) Integer age){
System.out.println(username);
return "success";
}
}

step3: 启动tomcat服务器

注意:请求参数中没有age, 但是由于age参数配置了required=false,表示请求中可以没有该参数,程序也能正常运行。

2. 获取请求体RequestBody

作用:

用于获取请求体内容。直接使用得到是key=value&key=value…结构的数据。

注意:get请求方式不适用。

属性:

required:是否必须有请求体。

默认值是:true。当取值为true时,get请求方式会报错。

如果取值为false,get请求得到是null

使用示例:

step1: 新建param.jsp页面

1
2
3
4
5
<form action="anno/test_requestBody" method="post">
用户名:<input type="text" name="username" ></br>
密码: <input type="password" name="password"></br>
<input type="submit" value="提交">
</form>

step2: 控制器代码

1
2
3
4
5
@RequestMapping("/test_requestBody")
public String test_requestBody(@RequestBody() String body){
System.out.println(body);
return "success";
}

step3: 启动tomcat服务器

3. 变量占位符PathVaribale

作用

用于绑定url中的占位符。例如:请求url中 /delete/{id},这个{id}就是url占位符。 url支持占位符是spring3.0之后加入的。是springmvc支持rest风格URL的一个重要标志。

属性

  • value:用于指定url中占位符名称。

  • required:是否必须提供占位符。

使用示例:

step1: 新建param.jsp页面

1
<a href="anno/test_pathVarible/2021">pathVarible注解演示</a>

step2: 控制器代码

1
2
3
4
5
@RequestMapping("/test_pathVarible/{id}")
public String test_pathVarible(@PathVariable(value="id") Integer id){
System.out.println(id);
return "success";
}

step3: 启动tomcat服务器

4. ModelAttribute

作用

该注解是SpringMVC4.3版本以后新加入的。它可以用于修饰方法和参数。

  • 出现在方法上,表示当前方法会在控制器的方法执行之前,先执行。它可以修饰没有返回值的方法,也可以修饰有具体返回值的方法。
  • 出现在参数上,获取指定的数据给参数赋值。

属性

value:用于获取数据的key。

key可以是POJO的属性名称,也可以是map结构的key。

应用场景:

当表单提交数据不是完整的实体类数据时,保证没有提交数据的字段使用数据库对象原来的数据。

例如:我们在编辑一个用户时,用户有一个创建信息字段,该字段的值是不允许被修改的。在提交表单数据是肯定没有此字段的内容,一旦更新会把该字段内容置为null,此时就可以使用此注解解决问题。

  1. 基于POJO属性属性

    step1: 新建param.jsp页面

    1
    2
    3
    4
    5
    <form action="anno/testModelAttribute" method="post">
    用户名:<input type="text" name="username">
    年龄:<input type="text" name="age">
    <input type="submit" name="提交">
    </form>

    step2:控制器代码

    1
    2
    3
    4
    5
    6
    7
    8
    9
    10
    11
    @RequestMapping("/testModelAttribute")
    public String testModelAttribute( User user){
    System.out.println("执行了控制器的testModelAttribute方法。。");
    System.out.println(user);
    return "success";
    }

    @ModelAttribute
    public void showModel(User user){//改方法会在控制器方法前执行
    System.out.println("执行了showModel方法。。"+user.getUsername());
    }

    step3: 启动tomcat服务器

  1. ModelAttribute修饰方法带返回值

    需求:修改用户信息,要求用户的密码不能修改

    step1: 新建param.jsp页面

    1
    2
    3
    4
    5
    <form action="anno/testModelAttribute" method="post">
    用户名:<input type="text" name="username">
    年龄:<input type="text" name="age">
    <input type="submit" name="提交">
    </form>

    step2: 控制器代码

    1
    2
    3
    4
    5
    6
    7
    8
    9
    10
    11
    12
    13
    14
    15
    16
    17
    18
    19
    20
    21
    22
    23
    24
    25
    26
    27
    @RequestMapping("/testModelAttribute")
    public String testModelAttribute( User user){
    System.out.println("执行了控制器的testModelAttribute方法。。");
    System.out.println(user);
    return "success";
    }

    @ModelAttribute
    public User showModel(String username){//改方法会在控制器方法前执行
    //模拟从数据库中查询数据
    User u=findByUsername(username);
    System.out.println("执行了showModel方法。。");
    return u;
    }

    /**
    * 模拟从数据里查询数据
    * @param name
    * @return
    */
    public User findByUsername(String name){
    User user=new User();
    user.setUsername(name);
    user.setPassword("1234");
    user.setAge(18);
    return user;
    }

    step3: 启动tomcat服务器

  2. 基于Map:ModelAttribute修饰方法带返回值

    需求:修改用户信息,要求用户的密码不能修改

    step1: 新建param.jsp页面

    1
    2
    3
    4
    5
    <form action="anno/testModelAttribute" method="post">
    用户名:<input type="text" name="username">
    年龄:<input type="text" name="age">
    <input type="submit" name="提交">
    </form>

    step2: 控制器代码

    1
    2
    3
    4
    5
    6
    7
    8
    9
    10
    11
    12
    13
    14
    15
    16
    17
    18
    19
    20
    21
    22
    23
    24
    25
    26
    27
    @RequestMapping("/testModelAttribute")
    public String testModelAttribute( @ModelAttribute("one") User user){
    System.out.println("执行了控制器的testModelAttribute方法。。");
    System.out.println(user);
    return "success";
    }

    @ModelAttribute
    public void showModel(String username, Map<String,User> map){//改方法会在控制器方法前执行
    //模拟从数据库中查询数据
    User u=findByUsername(username);
    System.out.println("执行了showModel方法。。");
    map.put("one",u);
    }

    /**
    * 模拟从数据里查询数据
    * @param name
    * @return
    */
    public User findByUsername(String name){
    User user=new User();
    user.setUsername(name);
    user.setPassword("1234");
    user.setAge(18);
    return user;
    }

    step3: 启动tomcat服务器

5. SessionAttribute

作用

用于多次执行控制器方法间的参数共享。

属性

  • value:用于指定存入的属性名称

  • type:用于指定存入的数据类型。

示例:

step1: param.jsp页面

1
2
3
<a href="anno/addSessionAttribute">存入session</a>
<a href="anno/getSessionAttribute">获取session</a>
<a href="anno/deleteSessionAttribute">删除session</a>

success.jsp页面

1
2
3
4
5
6
7
8
9
10
<%@ page contentType="text/html;charset=UTF-8" language="java" isELIgnored="false" %>
<html>
<head>
<title>Title</title>
</head>
<body>
${msg}
${sessionScope}
</body>
</html>

step2: 控制器代码

1
2
3
4
5
6
7
8
9
10
11
12
13
14
15
16
17
18
19
20
21
22
23
24
25
26
27
28
29
30
31
32
@Controller
@RequestMapping("/anno")
@SessionAttributes(value = {"msg"}, types = {String.class})//将msg存入session域中
public class AnnoController {
/**
*把数据存入SessionAttribute
*
* @param model
* @return
* Model是spring提供的一个接口,该接口有一个实现类ExtendedModelMap
* 该类继承了ModelMap,而ModelMap就是LinkedHashMap子类
* */
@RequestMapping("/addSessionAttribute")
public String addSessionAttribute(Model model){
model.addAttribute("msg","飞飞");
return "success";
}

@RequestMapping("/getSessionAttribute")
public String getSessionAttribute(ModelMap model){
System.out.println("getSessionAttribute");
String msg=(String)model.get("msg");
System.out.println(msg);
return "success";
}

@RequestMapping("/deleteSessionAttribute")
public String deleteSessionAttribute(SessionStatus sessionStatus){
sessionStatus.setComplete();
return "success";
}
}

step3: 启动tomcat服务器

2.64 处理器方法的返回值

2.641 返回值分类

使用@Controller注解的处理器的处理器方法,其返回值常用的有四种类型

  • 字符串(String)
  • 无返回值void
  • ModelAndView
  • 返回自定义类型对象
字符串

Controller方法返回字符串可以指定逻辑视图名,通过视图解析器解析为物理视图地址。

返回内部资源逻辑视图名

若返回的资源是内部资源,则视图解析器可以使用InternalResourceViewResolver内部资源视图解析器。此时处理器方法返回的字符串就是要跳转页面的文件名去掉文件扩展名后的部分。这个字符串与视图解析器中的prefix、suffix相结合,即可形成要访问的URI.

step1. 修改index.jsp页面

1
<a href="test/testString">testString</a>

step2. 修改controller

1
2
3
4
5
6
7
8
9
10
@Controller
@RequestMapping("/test")
public class ResponseController {

@RequestMapping("/testString")
public String test_String(){
System.out.println("返回值是String类型");
return "success";
}
}

step3. 启动tomcat服务器

void

在controller方法形参上可以定义request和response,使用request或response指定响应结果

1.使用request转向页面

1
2
3
4
@RequestMapping("testVoid")
public void test_void(HttpServletRequest request, HttpServletResponse response) throws Exception{
request.getRequestDispatcher("/WEB-INF/pages/success.jsp").forward(request,response);
}

2.使用response重定向

注意:重定向不能访问WEB-INF下的资源

1
2
3
4
@RequestMapping("testVoid")
public void test_void(HttpServletRequest request, HttpServletResponse response) throws Exception{
response.sendRedirect("/index.jsp.");
}

3.也可以通过response指定响应结果,例如响应json数据

1
response.setCharacterEncoding("utf-8"); response.setContentType("application/json;charset=utf-8"); response.getWriter().write("json串");

应用场景:AJAX异步请求响应

ModelAndView

step1:修改index.jsp和sucess.jsp页面

1
<a href="/test/testModelAndView">testModelAndView</a>
1
2
3
4
5
6
7
8
9
<%@ page contentType="text/html;charset=UTF-8" language="java"  isELIgnored="false" %>
<html>
<head>
<title>Title</title>
</head>
<body>
${requestScope.msg}
</body>
</html>

step2: 控制器代码

1
2
3
4
5
6
7
@RequestMapping("/testModelAndView")
public ModelAndView test_modelAndView(){
ModelAndView mv=new ModelAndView();
mv.addObject("msg","hello");
mv.setViewName("success");
return mv;
}

step3:启动tomcat服务器

2.641 ResponseBody响应json数据

2.7 请求转发和重定向

处理器向其他资源跳转有两种方式:请求转发重定向

根据要跳转的资源类型又可分为两类:跳转到页面和跳转到其他处理器

注意:对于请求转发可以是WEB-INF中的页面,而重定向的页面不能是WEB-INF中的页面,因为重定向相当于用户再次发送一次请求,而用户是不能直接访问WEB-INF中的资源的。
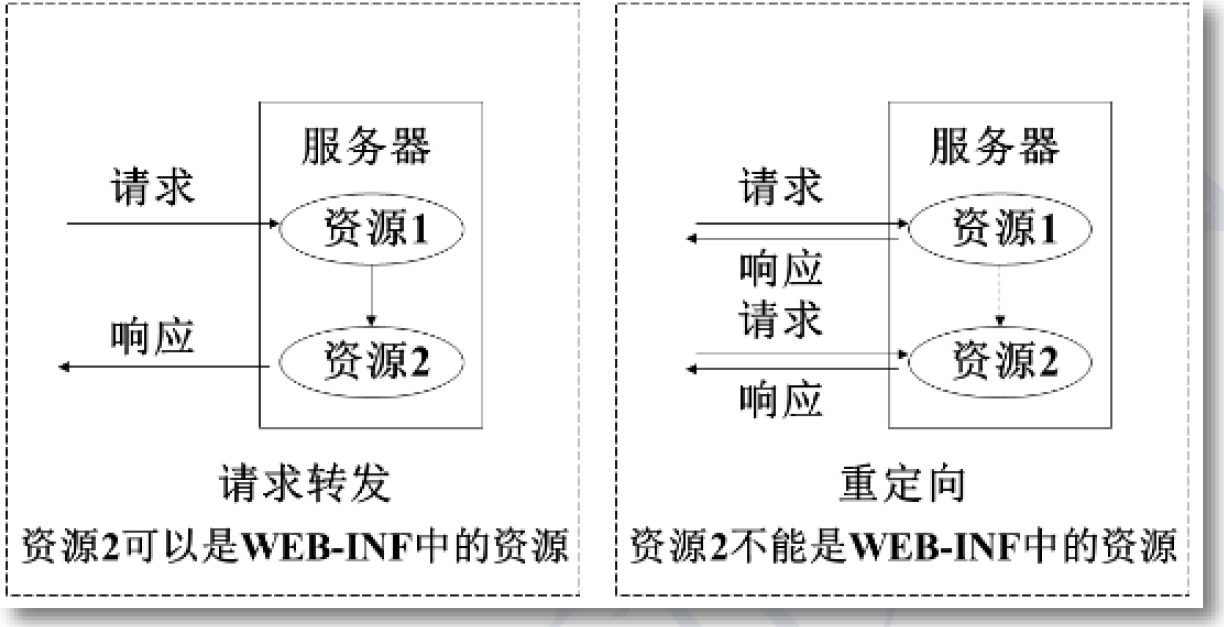
SpringMVC框架把原来的Servlet中的请求转发和重定向进行了封装:forward:表示转发,redirect:表示重定向。

请求转发:forward
1
2
3
语法:forward:完整视图路径
相当于
request.getResquestDispatcher(url).forward(response,request)

注意使用forward必须使用视图的完整路径,此时不需要视图解析器

使用示例

step1: index页面和跳转页面

1
2
<!--index页面-->
<a href="/account/forwardTest">测试forward</a>
1
2
3
4
5
6
7
8
9
10
<!--success页面-->
<%@ page contentType="text/html;charset=UTF-8" language="java" isELIgnored="false" %>
<html>
<head>
<title>Title</title>
</head>
<body>
<a>成功跳转!你好,${requestScope.msg}</a>
</body>
</html>

step2: 控制器代码

1
2
3
4
5
6
7
8
9
@Controller
@RequestMapping("/account")
public class Mycontroller {
@RequestMapping("/forwardTest")
public String forwardTest(){
System.out.println("forwordTest方法执行了。。。");
return "forward:/WEB-INF/jsp/success.jsp";
}
}

或者

1
2
3
4
5
6
7
8
9
10
11
12
@Controller
@RequestMapping("/account")
public class Mycontroller {
@RequestMapping("/forwardTest")
public ModelAndView forwardTest(){
ModelAndView mv=new ModelAndView();
mv.addObject("msg","lfTech");
mv.setViewName("forward:/WEB-INF/jsp/success.jsp");
System.out.println("forwordTest方法执行了。。。");
return mv;
}
}

step3: 启动tomcat服务器

重定向:redirect
1
2
语法:redirect: 视图完整路径 
相当于response.redirect();

注意:重定向不能访问受保护的WEB-INF目录下的资源

使用示例:

step1:index页面和跳转页面

1
2
<!--index页面-->
<a href="/account/redirectTest">测试redirect</a>
1
2
3
4
5
6
7
8
9
10
<!--testRedirect页面-->
<%@ page contentType="text/html;charset=UTF-8" language="java" %>
<html>
<head>
<title>Title</title>
</head>
<body>
<a>成功重定向,你好</a>
</body>
</html>

step2: 控制器代码

1
2
3
4
5
6
7
8
9
10
@Controller
@RequestMapping("/account")
public class Mycontroller {

@RequestMapping("/redirectTest")
public String forwardTest(){

System.out.println("redirectTest方法执行了。。。");
return "redirect:/testRedirect.jsp";
}

或者

1
2
3
4
5
6
7
8
9
10
11
12
@Controller
@RequestMapping("/account")
public class Mycontroller {

@RequestMapping("/redirectTest")
public ModelAndView forwardTest(){
ModelAndView mv=new ModelAndView();
System.out.println("redirectTest方法执行了。。。");
mv.setViewName("redirect:/testRedirect.jsp");
return mv;
}
}

step3: 启动tomcat服务器

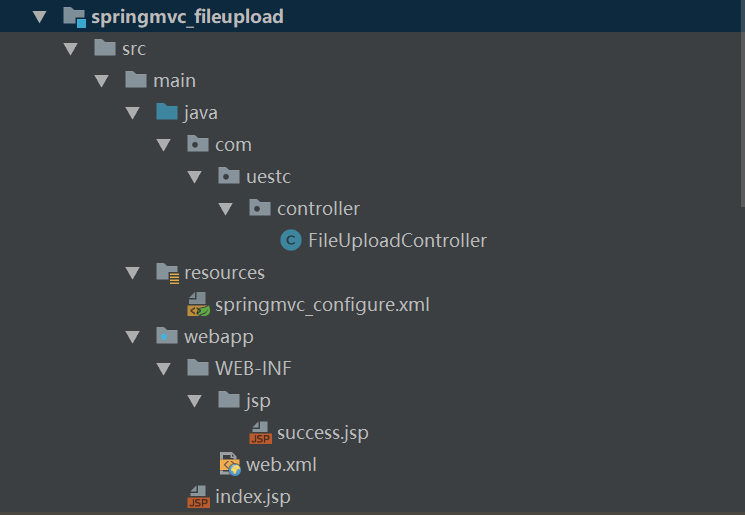
2.8 文件上传

文件上传的必要前提:

1
2
3
4
5
6
7
1、前端表单要求:
a.form表单的method设置为POST
b.form表单enctype设置为multipart/form-data
c.提供一个文件选择域<input type=”file” />
只有在这样的情况下,浏览器才会把用户选择的文件以二进制数据发送给服务器;
2、借助第三方组件实现文件上传
使用Commons-fileupload组件实现文件上传,需要导入该组件相应的支撑jar包:Commons-fileupload和commons-io。commons-io 不属于文件上传组件的开发jar文件,但Commons-fileupload 组件从1.1 版本开始,它工作时需要commons-io包的支持。

传统方式的文件上传

1、导入文件上传所需要的jar的坐标

1
2
3
4
5
6
7
8
9
10
11
<dependency>
<groupId>commons-fileupload</groupId>
<artifactId>commons-fileupload</artifactId>
<version>1.3.1</version>
</dependency>

<dependency>
<groupId>commons-io</groupId>
<artifactId>commons-io</artifactId>
<version>2.4</version>
</dependency>

2、编写文件上传的JSP页面

1
2
3
4
5
6
7
8
9
10
11
12
<%@ page contentType="text/html;charset=UTF-8" language="java" %>
<html>
<head>
<title>文件上传</title>
</head>
<body>
<form action="/user/upload" method="post" enctype="multipart/form-data">
选择文件 <input type="file"><br/>
<input type="submit" value="上传">
</form>
</body>
</html>

3、编写文件上传的Controller控制器

1
2
3
4
5
6
7
8
9
10
11
12
13
14
15
16
17
18
19
20
21
22
23
24
25
26
27
28
29
30
31
32
33
34
35
36
37
38
39
40
41
42
43
44
package com.uestc.controller;
@Controller
@RequestMapping("/user")
public class FileUploadController {
@RequestMapping("/upload")
public String fileupload(HttpServletRequest request) throws Exception{
//先获取到要上传的文件目录
String path=request.getSession().getServletContext().getRealPath("/uploads/");
// 创建File对象,一会向该路径下上传文件
File file=new File(path);
//判断路径是否存在
if(!file.exists()){
//不存在,则创建
file.mkdirs();
}

//创建磁盘文件项工厂
DiskFileItemFactory factory=new DiskFileItemFactory();
ServletFileUpload fileUpload=new ServletFileUpload(factory);
//解析request对象
List<FileItem> list= fileUpload.parseRequest(request);
System.out.println(list);
//遍历
for(FileItem fileItem:list){
//判断文件项是普通字段还是文件
if(fileItem.isFormField()){
System.out.println("普通字段");
}else{
//文件项
//获取文件的名称
String fileName=fileItem.getName();
//把文件的名称设置成唯一的字符串
String uuid= UUID.randomUUID().toString().replace("-","");
fileName=uuid+fileName;
//上传文件
fileItem.write(new File(file,fileName));
//删除临时文件
fileItem.delete();
}
}

return "success";
}
}

效果展示:

SpringMVC文件上传

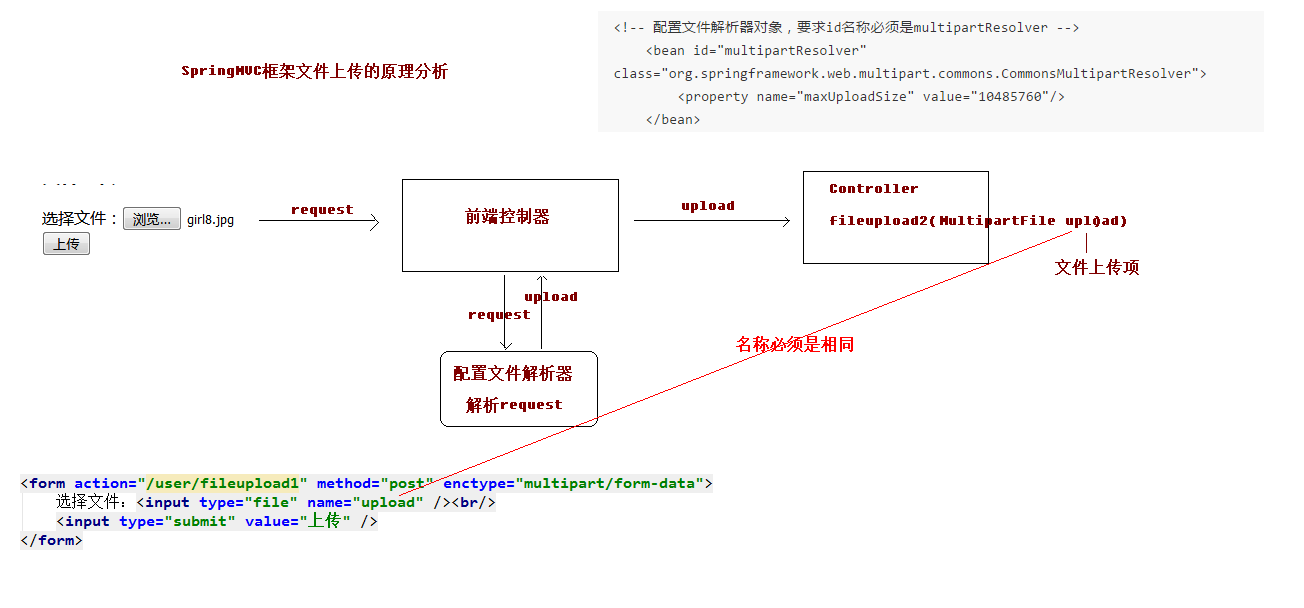
原理图

1、SpringMVC框架提供了MultipartFile对象,该对象表示上传的文件,要求变量名称必须和表单file标签的name属性名称相同

2、Spring MVC使用Apache Commons FileUpload技术实现了一个MultipartResolver实现类:CommonsMultipartResolver。因此,SpringMVC的文件上传还需要依赖Apache Commons FileUpload的组件。

1、配置文件解析器

注意: 文件上传的解析器id是固定的,不能起别的名称,否则无法实现请求参数的绑定。(不光是文件,其他字段也将无法绑定)

1
2
3
4
5
 <!--配置文件解析器-->
<!-- id的值是固定的-->
<bean id="multipartResolver" class="org.springframework.web.multipart.commons.CommonsMultipartResolver">
<property name="maxUploadSize" value="10485760"></property>
</bean>

2、控制器代码

1
2
3
4
5
6
7
8
9
10
11
12
13
14
15
16
17
18
19
20
@RequestMapping("/user")
public class FileUploadController {
@RequestMapping("/fileUploadMvc")
public String fileUploadMvc(HttpServletRequest request , MultipartFile upload) throws Exception{
String path=request.getSession().getServletContext().getRealPath("/uploads");
File file=new File(path);
if(!file.exists()){
file.mkdirs();
}
//获取文件上传项
//获取文件的名称
String filename=upload.getOriginalFilename();
//把名字设置成唯一值
String uuid=UUID.randomUUID().toString().replace("-","");
filename=uuid+filename;
//完成文件上传
upload.transferTo(new File(path,filename));
return "success";
}
}

CommonsMultipartFile 的 常用方法:

1
2
3
String getOriginalFilename():获取上传文件的原名
InputStream getInputStream():获取文件流
void transferTo(File dest):将上传文件保存到一个目录文件中

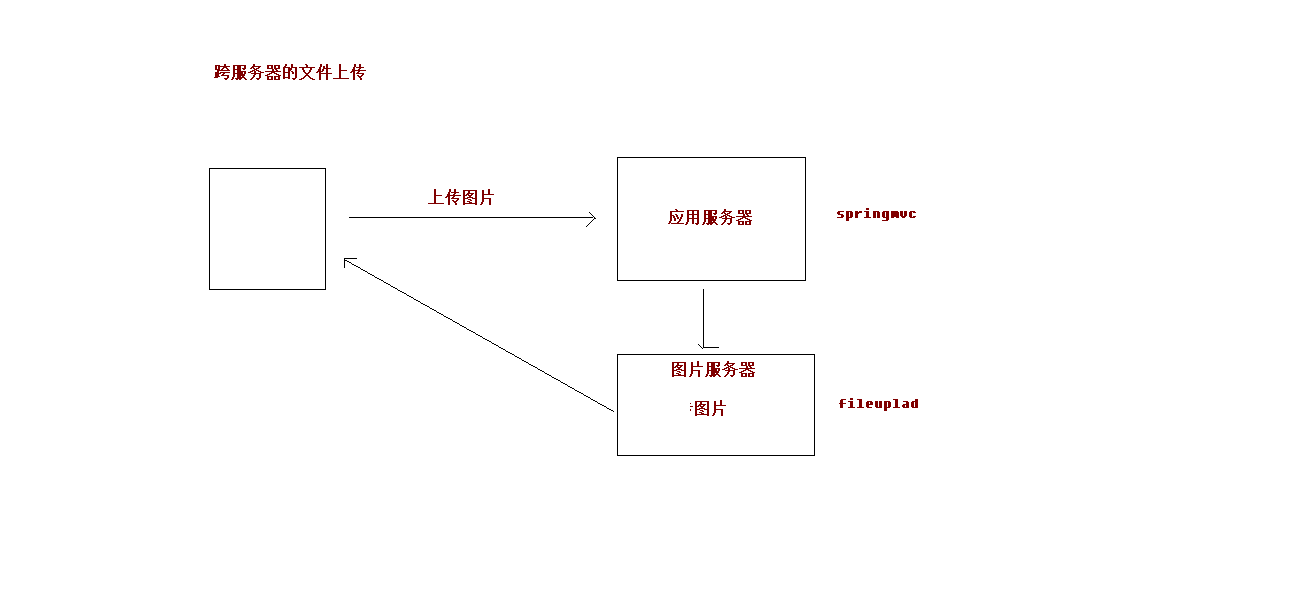
SpringMVC跨服务器方式的文件上传

分服务器的目的

在实际开发中,我们会有很多处理不同功能的服务器。例如:

  • 应用服务器:负责部署我们的应用

  • 数据库服务器:运行我们的数据库

  • 缓存和消息服务器:负责处理大并发访问的缓存和消息

  • 文件服务器:负责存储用户上传文件的服务器。

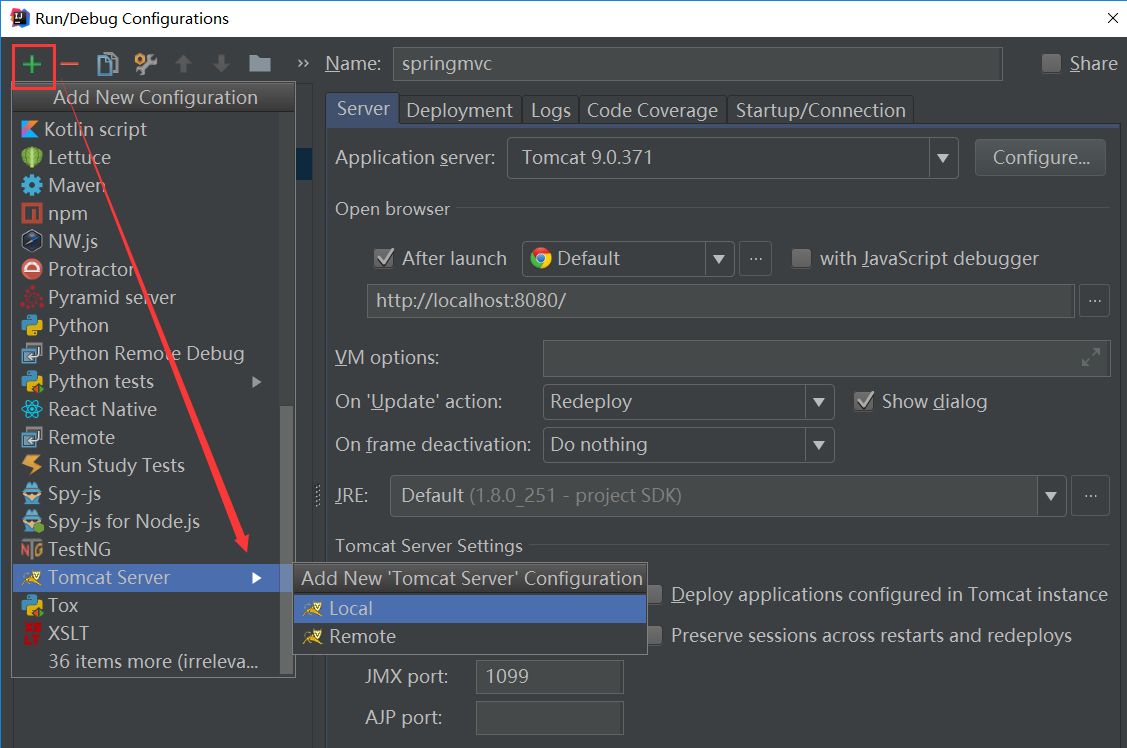
准备两个tomcat服务器,并创建一个用于存放图片的web工程

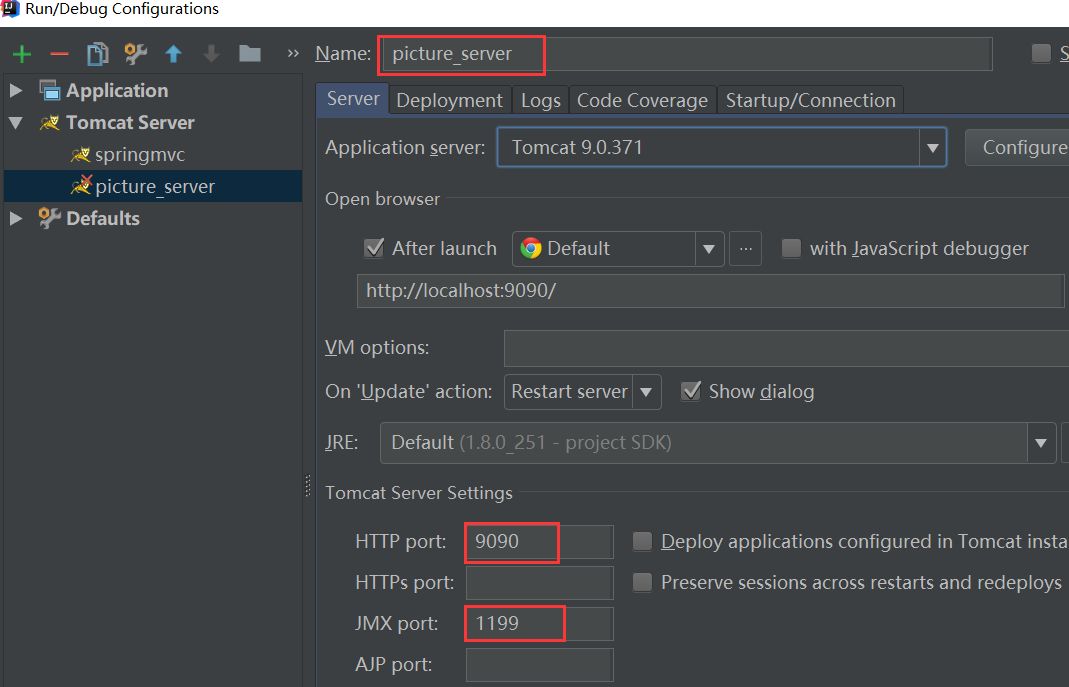
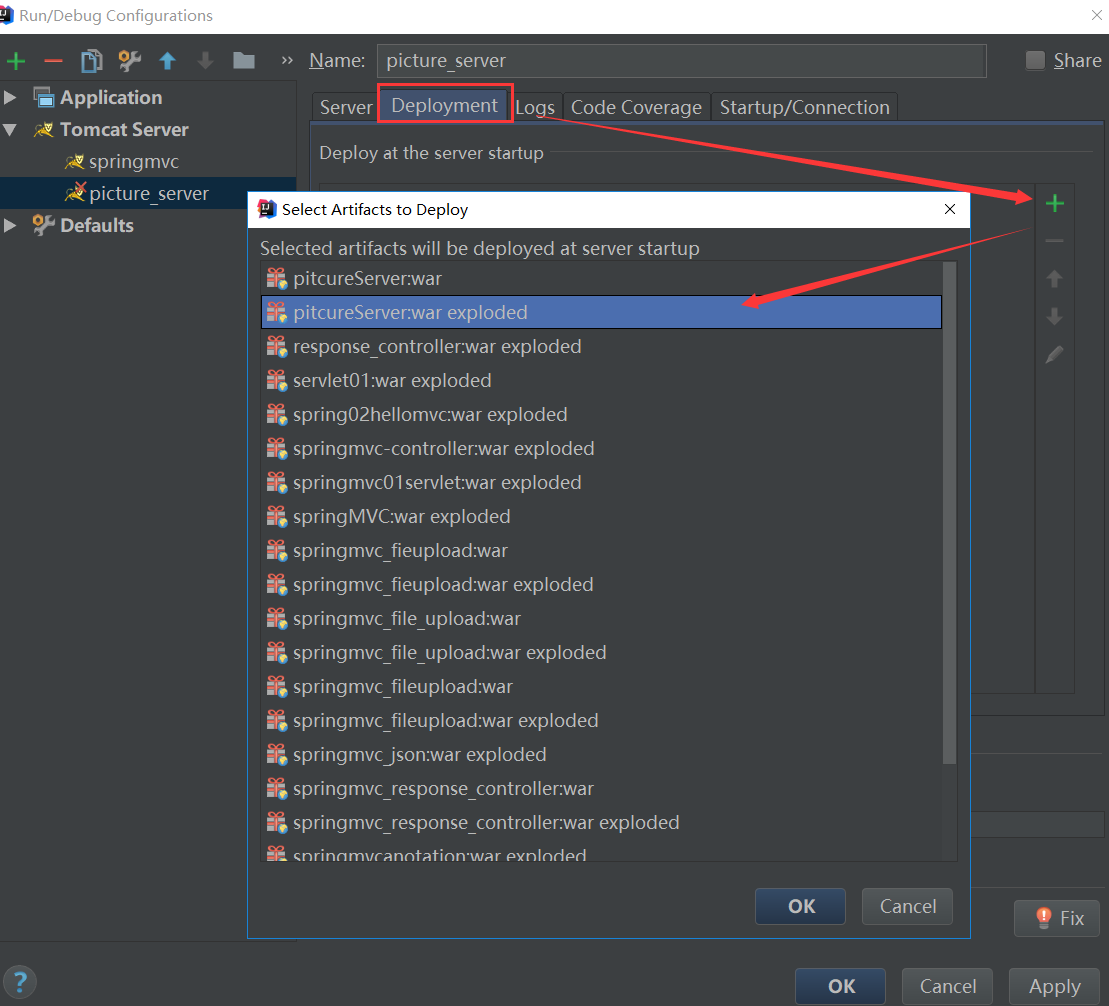
1、搭建图片服务器
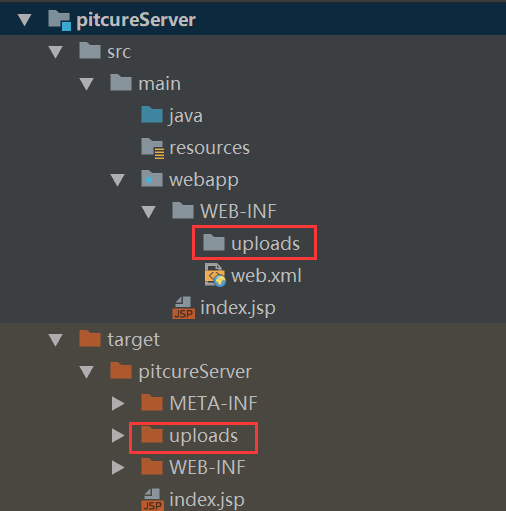
部署图像服务器:
2、导入开发需要的jar包

1
2
3
4
5
6
7
8
9
10
<dependency>
<groupId>com.sun.jersey</groupId>
<artifactId>jersey-core</artifactId>
<version>1.18.1</version>
</dependency>
<dependency>
<groupId>com.sun.jersey</groupId>
<artifactId>jersey-client</artifactId>
<version>1.18.1</version>
</dependency>

3、编写文件上传的JSP页面

1
2
3
4
<form action="/user/fileUploadMvc1" method="post" enctype="multipart/form-data">
选择文件 <input type="file" name="upload"><br/>
<input type="submit" value="上传">
</form>

4、编写应用服务器的控制器

1
2
3
4
5
6
7
8
9
10
11
12
13
14
15
16
17
18
19
20
21
22
23
24
@RequestMapping("/user")
public class FileUploadController {
@RequestMapping("/fileUploadMvc1")
public String fileUploadMvc1( MultipartFile upload) throws Exception{
System.out.println("跨服务器文件上传");
//定义上传文件
String path="http://localhost:9090/picture_server/uploads/";

//获取文件的名称
String filename=upload.getOriginalFilename();
//把名字设置成唯一值
String uuid=UUID.randomUUID().toString().replace("-","");
filename=uuid+filename;

//完成文件上传
//创建客户端对象
Client client=Client.create();
//和图片服务器进行连接
WebResource webResource=client.resource(path+filename);
//上传文件
webResource.put(upload.getBytes());
return "success";
}
}

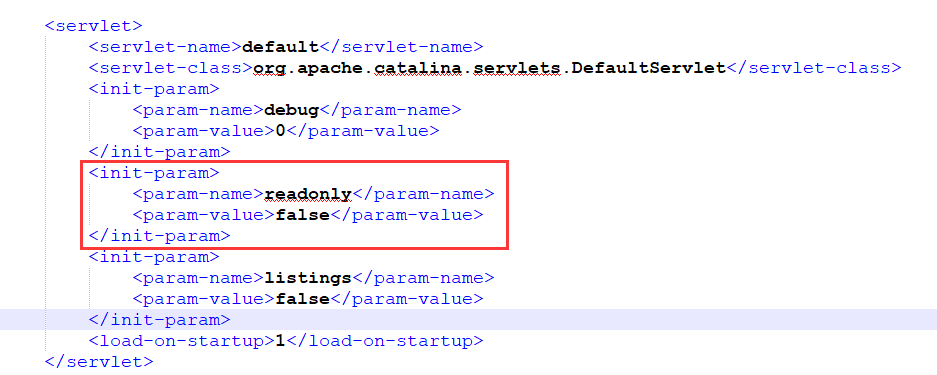
遇到的问题:405错误

解决:出现此类问题,可能的原因是Tomact服务器权限不足。我们只需要把其权限放开就行
在Tomact服务器根目录conf下修改web.xml文件,增加读写权限
2.9 异常处理

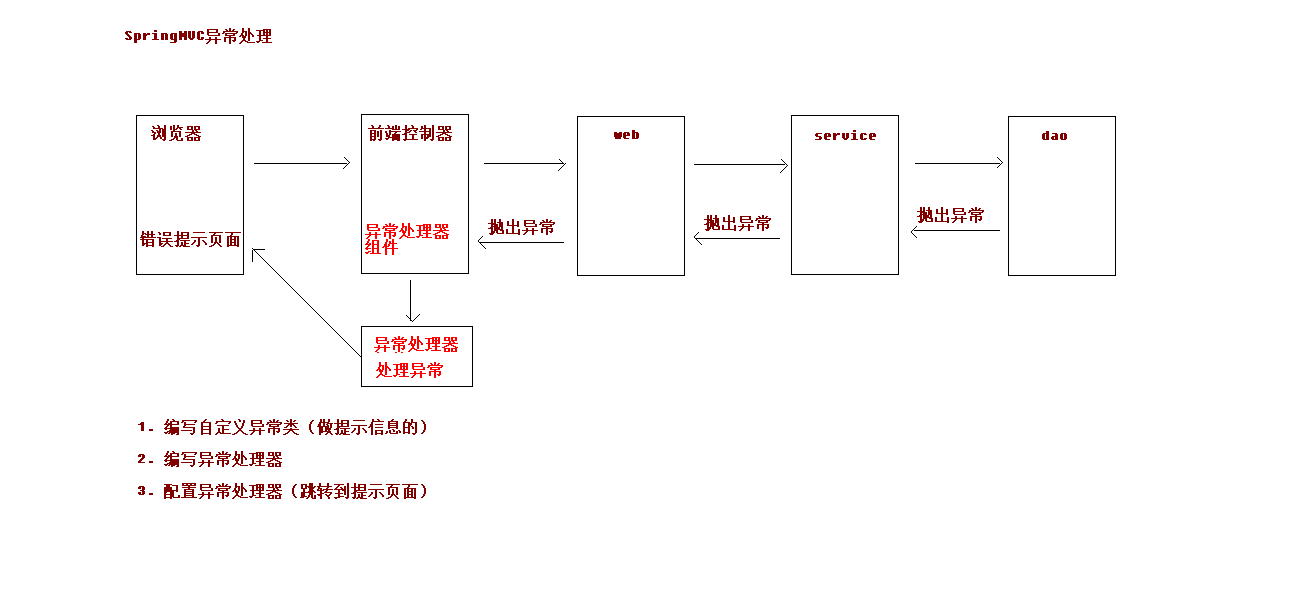
系统中异常包括两类:预期异常和运行时异常RuntimeException,前者通过捕获异常从而获取异常信息,后者主要通过规范代码开发、测试通过手段减少运行时异常的发生。

系统的dao、service、controller出现都通过throws Exception向上抛出,最后由springmvc前端控制器交由异常处理器进行异常处理,如下图:
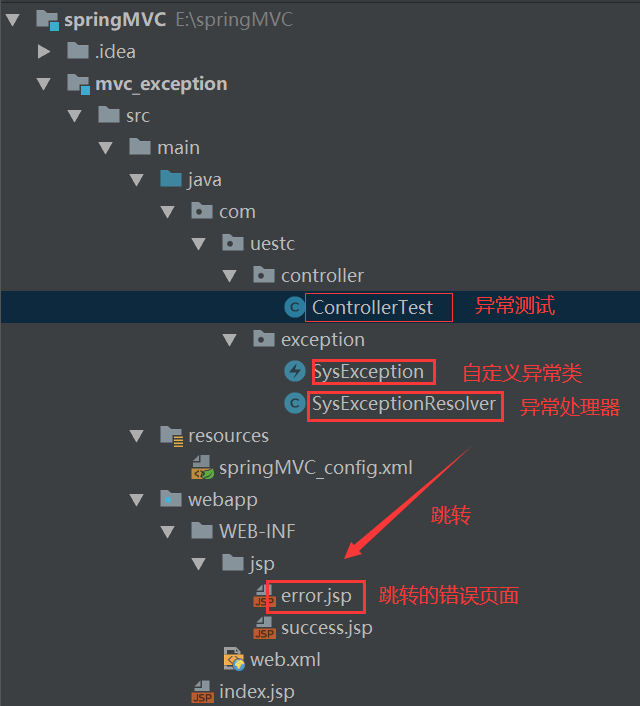
工程目录

步骤:

1、自定义异常类和错误页面

1
2
3
4
5
6
7
8
9
10
11
12
13
14
15
16
17
18
19
20
21
package com.uestc.exception;

/**
* 自定义异常类
*/
public class SysException extends Exception {

private String message;

public SysException(String message) {
this.message = message;
}

public String getMessage() {
return message;
}

public void setMessage(String message) {
this.message = message;
}
}

2、自定义异常处理器

1
2
3
4
5
6
7
8
9
10
11
12
13
14
15
16
17
18
19
20
21
22
23
24
25
26
27
28
29
/**
* 异常处理器
*/
public class SysExceptionResolver implements HandlerExceptionResolver{
/**
* 处理异常的业务逻辑
* @param httpServletRequest
* @param httpServletResponse
* @param o
* @param ex
* @return
*/

@Override
public ModelAndView resolveException(HttpServletRequest httpServletRequest, HttpServletResponse httpServletResponse, Object o, Exception ex) {
//获取异常对象
SysException e=null;
if(ex instanceof SysException){
e=(SysException)ex;
}else{
e=new SysException("系统正在维护");
}
//创建ModelAndView
ModelAndView mv=new ModelAndView();
mv.addObject("err_msg", e.getMessage());
mv.setViewName("error");
return mv;
}
}

3、在springmvc.xml配置异常处理器

1
2
<!--配置异常处理器-->
<bean id ="sysException" class="com.uestc.exception.SysExceptionResolver"></bean>

4、编写测试类

1
2
3
4
5
6
7
8
9
10
11
12
13
14
15
16
@Controller
@RequestMapping("/test")
public class ControllerTest {
@RequestMapping("/test1")
public String test1() throws Exception{

try {
int a=10/0;
} catch (Exception e) {
e.printStackTrace();
//抛出自定义异常信息
throw new SysException("除0错误");
}
return "success";
}
}

效果展示:

3.0 拦截器

概述

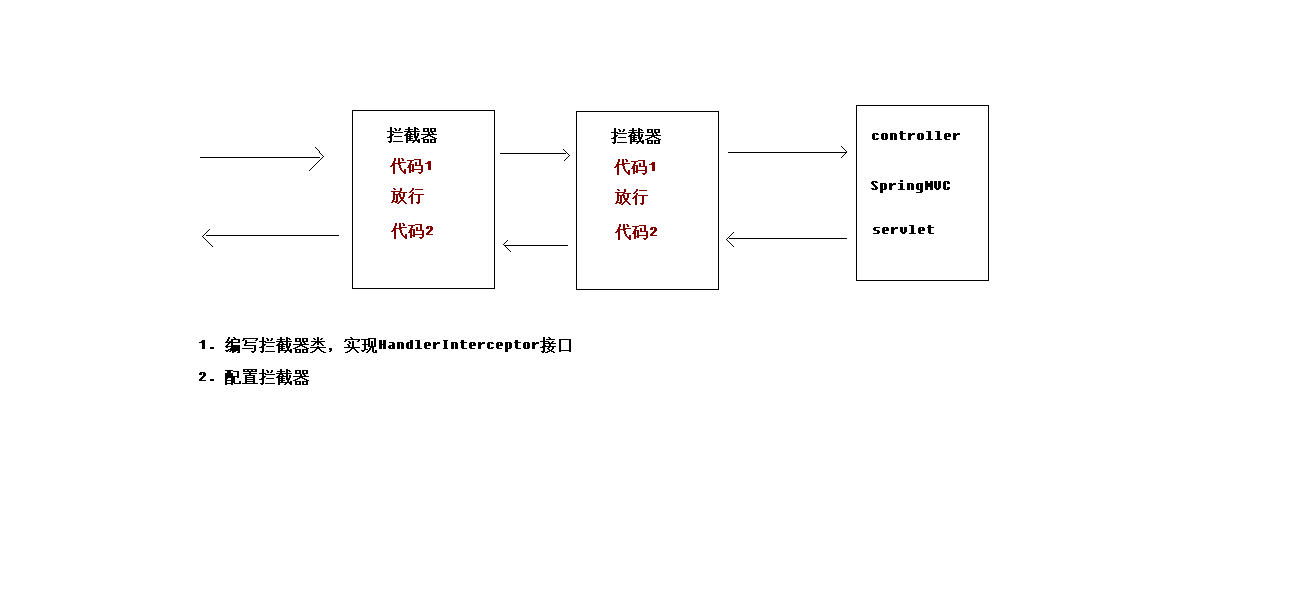
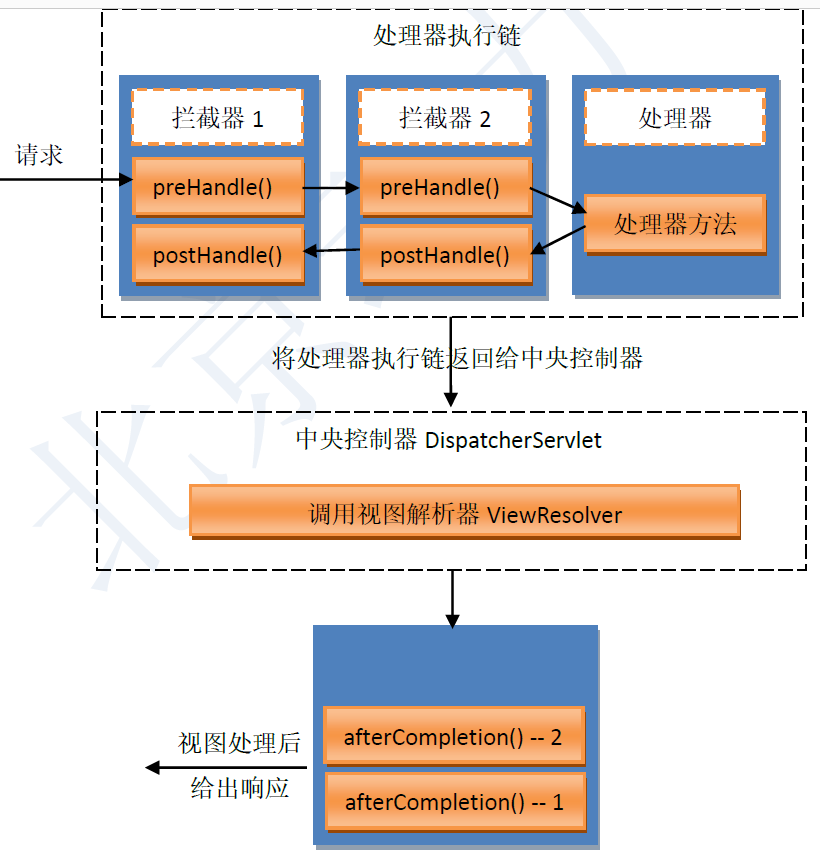
SpringMVC的 Interceptor拦截器是非常重要和相当有用的,它的主要作用是拦截指定用户的请求,并进行相应的预处理和后处理。其拦截的时间点在于:“处理器映射器根据用户提交的请求映射除了所要执行的处理器类,并且也找到了要执行该处理器类的处理器适配器,在处理器适配器执行处理器之前”。 当然在处理器映射器映射出要执行的处理器类时,已经将拦截器与处理器组合成为了一个处理器执行链,并返回给了中央调度器。

1、SpringMVC框架中的拦截器用于对处理器进行预处理和后处理的技术

2、可以定义拦截器链,连接器链就是将拦截器按着一定的顺序结成一条链,在访问被拦截的方法时,拦截器链中的拦截器会按着定义的顺序执行。

3、拦截器也是AOP思想的一种实现方式

4、想要自定义拦截器,需要实现HandlerInterceptor接口。

拦截器和过滤器的功能比较类似,有区别

1、过滤器是Servlet规范的一部分,任何框架都可以使用过滤器技术,而拦截器是SpringMVC框架独有的。

2、过滤器配置了/*,可以拦截任何资源,而拦截器只会对控制器中的方法进行拦截
自定义拦截器步骤:

1、创建类,实现HandlerInterceptor接口,重写需要的方法

1
2
3
4
5
6
7
8
9
10
11
12
13
14
15
16
17
18
19
20
21
22
23
24
25
26
27
28
public class MyInterceptor implements HandlerInterceptor {

/**
* 预处理,controller方法执行前
* 返回true 放行,执行下一个拦截器,如果下面没有拦截器,则执行Controller中的方法
* 返回false 不放行,
* @param request
* @param response
* @param handler
* @return
* @throws Exception
*/
@Override
public boolean preHandle(HttpServletRequest request, HttpServletResponse response, Object handler) throws Exception {
System.out.println("MyInterceptor执行了");
return true;
}

@Override
public void postHandle(HttpServletRequest request, HttpServletResponse response, Object handler, ModelAndView modelAndView) {
System.out.println("postHandle...");
}

@Override
public void afterCompletion(HttpServletRequest request, HttpServletResponse response, Object handler, Exception ex) {
System.out.println("afterCompletion...");
}
}

2、在springmvc.xml中配置拦截器类

1
2
3
4
5
6
7
8
9
10
11
12
13
14
15
16
17
<!--配置拦截器-->
<mvc:interceptors>
<!--配置拦截器-->
<mvc:interceptor>
<!--要拦截的具体的方法
包括路径及其子路径
1、/admin/* 拦截的是/admin/add等等这种 , /admin/add/user不会被拦截
2、/admin/** 拦截的是/admin/下的所有
-->
<mvc:mapping path="/test/*"/>
<!--不要拦截的方法
<mvc:exclude-mapping path=""></mvc:exclude-mapping>-->

<!-- 注册拦截器对象 -->
<bean class="com.uestc.interceptor.MyInterceptor"></bean>
</mvc:interceptor>
</mvc:interceptors>

3、编写一个Controller,接收请求

1
2
3
4
5
6
7
8
9
@Controller
@RequestMapping("/test")
public class Test {
@RequestMapping("/testInterceptor")
public String testInterceptor(){
System.out.println("testInterceptor执行了。。");
return "success";
}
}

4、index.jsp和跳转界面success.jsp

1
<a href="/test/testInterceptor">测试拦截器</a>
1
<%System.out.println("成功跳转success.jsp");%>

5、启动tomcat服务器

拦截器的细节

拦截器的放行

放行的含义是指,如果有下一个拦截器就执行下一个,如果该拦截器处于拦截器链的最后一个,则执行控制器中的方法。

拦截器中方法的说明

HandlerInterceptor接口中的三个方法:

1、preHandle方法是controller方法执行前拦截的方法

  • 可以使用request或者response跳转到指定的页面

  • return true放行,执行下一个拦截器,如果没有拦截器,执行controller中的方法。

  • return false不放行,不会执行controller中的方法。

1
public boolean preHandle(HttpServletRequest request, HttpServletResponse response, Object handler)

2、postHandle是controller方法执行后执行的方法,在JSP视图执行前。

  • 可以使用request或者response跳转到指定的页面

  • 如果指定了跳转的页面,那么controller方法跳转的页面将不会显示。

1
public void postHandle(HttpServletRequest request, HttpServletResponse response, Object handler, ModelAndView modelAndView)

3、afterCompletion方法是在JSP执行后执行: request或者response不能再跳转页面了

只有preHandle返回true才调用

1
public void afterCompletion(HttpServletRequest request, HttpServletResponse response, Object handler, Exception ex)

配置多个拦截器:

从下图可以看出,只要有一个preHandle()方法返回false, 则上部的执行链就会断开,其后续的处理器方法与postHandler()方法将无法执行。但无论执行链执行情况如何,只要执行链中有一个preHander()方法返回true,就会执行afterCompletion()方法,最终都会给出响应。
1、再编写一个拦截器的类

1
2
3
4
5
6
7
8
9
10
11
12
13
14
15
16
17
public class MyInterceptor2 implements HandlerInterceptor {
@Override
public boolean preHandle(HttpServletRequest request, HttpServletResponse response, Object handler) throws Exception {
System.out.println("preHandle...2");
return true;
}

@Override
public void postHandle(HttpServletRequest request, HttpServletResponse response, Object handler, ModelAndView modelAndView) {
System.out.println("postHandle...2");
}

@Override
public void afterCompletion(HttpServletRequest request, HttpServletResponse response, Object handler, Exception ex) {
System.out.println("afterCompletion...2");
}
}

2、配置2个拦截器

1
2
3
4
5
6
7
8
9
10
11
12
13
14
15
16
17
18
19
20
<!--配置拦截器-->
<mvc:interceptors>
<!--配置拦截器1-->
<mvc:interceptor>
<!--要拦截的具体的方法-->
<mvc:mapping path="/test/*"/>
<!--不要拦截的方法
<mvc:exclude-mapping path=""></mvc:exclude-mapping>-->
<bean class="com.uestc.interceptor.MyInterceptor"></bean>
</mvc:interceptor>

<!--配置拦截器2-->
<mvc:interceptor>
<!--要拦截的具体的方法-->
<mvc:mapping path="/test/*"/>
<!--不要拦截的方法
<mvc:exclude-mapping path=""></mvc:exclude-mapping>-->
<bean class="com.uestc.interceptor.MyInterceptor2"></bean>
</mvc:interceptor>
</mvc:interceptors>

执行结果:

拦截器的简单应用: 验证用户是否登录 (认证用户)

思路:

1
2
3
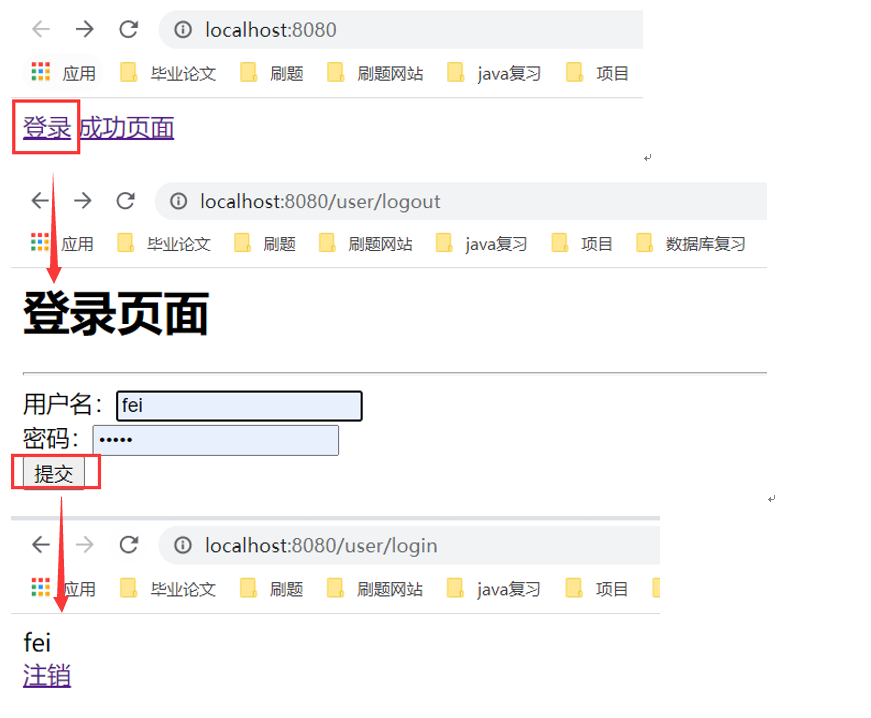
1、有一个登陆页面,需要写一个controller访问页面。
2、登陆页面有一提交表单的动作。需要在controller中处理。判断用户名密码是否正确。如果正确,向session中写入用户信息。返回登陆成功。
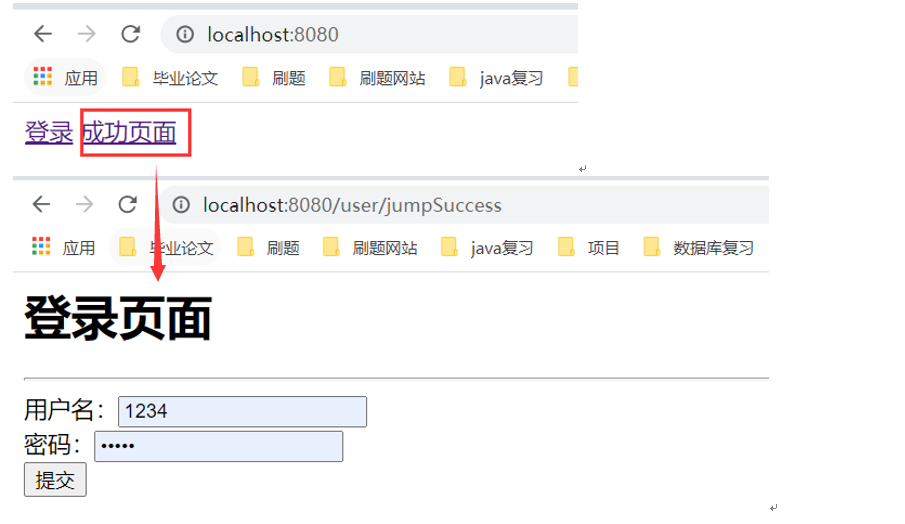
3、拦截用户请求,判断用户是否登陆。如果用户已经登陆。放行, 如果用户未登陆,跳转到登陆页面

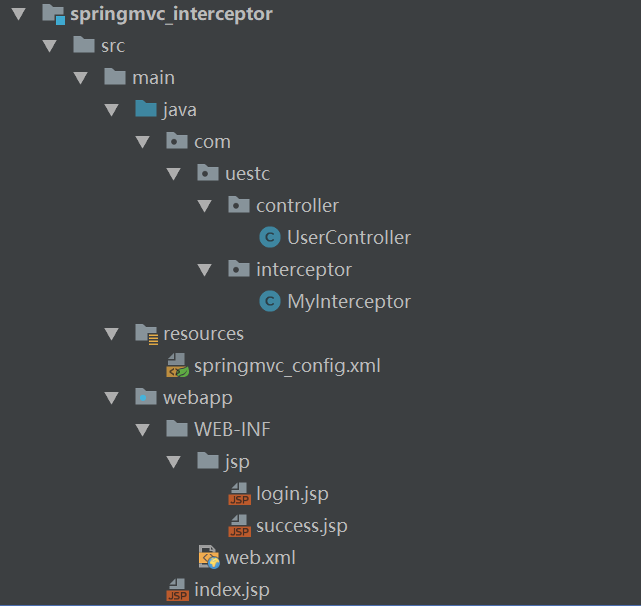
工程目录:

1、编写一个登陆页面 login.jsp和index.jsp页面

1
2
3
4
5
6
7
8
9
10
11
12
13
14
15
16
<!--login.jsp-->
<%@ page contentType="text/html;charset=UTF-8" language="java" isELIgnored="false" %>
<html>
<head>
<title>Title</title>
</head>
<h1>登录页面</h1>
<hr>
<body>
<form action="${pageContext.request.contextPath}/user/login" method="post">
用户名:<input type="text" name="username"><br>
密码:<input type="password" name="password"><br>
<input type="submit" value="提交">
</form>
</body>
</html>
1
2
3
4
5
6
7
8
9
10
11
<!--index.jsp-->
<%@ page contentType="text/html;charset=UTF-8" language="java" isELIgnored="false" %>
<html>
<head>
<title>Title</title>
</head>
<body>
<a href="${pageContext.request.contextPath}/user/jumpLogin">登录</a>
<a href="${pageContext.request.contextPath}/user/jumpSuccess">成功页面</a>
</body>
</html>

3、编写一个Controller处理请求

1
2
3
4
5
6
7
8
9
10
11
12
13
14
15
16
17
18
19
20
21
22
23
24
25
26
27
28
29
30
31
32
33
34
@Controller
@RequestMapping("/user")
public class UserController {
//跳转到登陆页面
@RequestMapping("/jumpLogin")
public String jumpLogin(){
System.out.println("跳转登陆界面");
return "login";
}

//跳转到成功页面

@RequestMapping("/jumpSuccess")
public String jumpSuccess(){
return "success";
}

//登陆提交
@RequestMapping("/login")
public String login(HttpServletRequest request,String username, String pwd){
// 向session记录用户身份信息
System.out.println("接收前端==="+username);
request.getSession().setAttribute("user", username);
return "success";
}

//退出登陆
@RequestMapping("logout")
public String logout(HttpSession session) throws Exception {
// session 过期
session.invalidate();
return "login";
}
}

4、编写一个登陆成功的页面 success.jsp

1
2
3
4
5
6
7
8
9
10
<%@ page contentType="text/html;charset=UTF-8" language="java" isELIgnored="false" %>
<html>
<head>
<title>登录成功页面</title>
</head>
<body>
${user}<br>
<a href="${pageContext.request.contextPath}/user/logout">注销</a>
</body>
</html>

5、在 index 页面上测试跳转!启动Tomcat 测试,未登录也可以进入主页!

6、编写用户登录拦截器

1
2
3
4
5
6
7
8
9
10
11
12
13
14
15
16
17
18
19
20
21
22
23
24
25
26
27
28
29
30
31
32
33
34
35
36
37
38
39
40
41
42
43
44
45
46
47
package com.uestc.interceptor;

import org.springframework.web.servlet.HandlerInterceptor;
import org.springframework.web.servlet.ModelAndView;

import javax.servlet.http.HttpServletRequest;
import javax.servlet.http.HttpServletResponse;

public class MyInterceptor implements HandlerInterceptor {

/**
* 预处理,controller方法执行前
* 返回true 放行,执行下一个拦截器,如果下面没有拦截器,则执行Controller中的方法
* 返回false 不放行,
* @param request
* @param response
* @param handler
* @return
* @throws Exception
*/
@Override
public boolean preHandle(HttpServletRequest request, HttpServletResponse response, Object handler) throws Exception {
//如果是登陆界面,则放行
if(request.getRequestURI().contains("login")){
return true;
}

//如果用户已经登陆也放行
if(request.getAttribute("user")!=null){
return true;
}

//如果没有登陆,则跳转登陆界面
request.getRequestDispatcher("/WEB-INF/jsp/login.jsp").forward(request,response);
return false;
}

@Override
public void postHandle(HttpServletRequest request, HttpServletResponse response, Object handler, ModelAndView modelAndView) {

}

@Override
public void afterCompletion(HttpServletRequest request, HttpServletResponse response, Object handler, Exception ex) {

}
}

7、在Springmvc的配置文件中注册拦截器

1
2
3
4
5
6
7
8
9
10
11
<!--配置拦截器-->
<mvc:interceptors>
<!--配置拦截器-->
<mvc:interceptor>
<!--要拦截的具体的方法-->
<mvc:mapping path="/user/*"/>
<!--不要拦截的方法
<mvc:exclude-mapping path=""></mvc:exclude-mapping>-->
<bean class="com.uestc.interceptor.MyInterceptor"></bean>
</mvc:interceptor>
</mvc:interceptors>

8、再次重启Tomcat测试!

3.1 RestFul 风格

概念

Restful就是一个资源定位及资源操作的风格。不是标准也不是协议,只是一种风格。基于这个风格设计的软件可以更简洁,更有层次,更易于实现缓存等机制。

功能

资源:互联网所有的事物都可以被抽象为资源

资源操作:使用POST、DELETE、PUT、GET,使用不同方法对资源进行操作。

分别对应 添加、 删除、修改、查询。

传统方式操作资源 :通过不同的参数来实现不同的效果!方法单一,post 和 get

http://127.0.0.1/item/queryItem.action?id=1 查询,GET

http://127.0.0.1/item/saveItem.action 新增,POST

http://127.0.0.1/item/updateItem.action 更新,POST

http://127.0.0.1/item/deleteItem.action?id=1 删除,GET或POST

使用RESTful操作资源 :可以通过不同的请求方式来实现不同的效果!如下:请求地址一样,但是功能可以不同!

http://127.0.0.1/item/ 查询,GET

http://127.0.0.1/item 新增,POST

http://127.0.0.1/item 更新,PUT

http://127.0.0.1/item/ 删除,DELETE

测试

  1. 在新建一个类 RestFulController

    1
    2
    3
    @Controller
    public class RestFulController {
    }
  2. 在Spring MVC中可以使用 @PathVariable 注解,让方法参数的值对应绑定到一个URI模板变量上。

    1
    2
    3
    4
    5
    6
    7
    8
    9
    10
    11
    12
    13
    14
    15
    16
    @Controller
    public class RestFulController {

    //映射访问路径
    @RequestMapping("/add/{p1}/{p2}")
    public String index(@PathVariable int p1, @PathVariable int p2, Model model){

    int result = p1+p2;
    //Spring MVC会自动实例化一个Model对象用于向视图中传值
    model.addAttribute("msg", "结果:"+result);
    //返回视图位置
    return "test";

    }

    }
  3. 我们来测试请求查看下